Monday, July 30, 2012

DuWop Lip Venom Review & Tutorial

Hey everyone!


      I am really excited about today's post because it is a review/tutorial, and it is featuring the DuWop Lip Venom. I did a post a while ago on how to make your lips look fuller, and that works really well for creating an everyday lip color and making your lips look bigger. This actually makes your lips look bigger, no injections needed!


I know that the DuWop lip venom came out ages ago, but I found a way to make the effect last longer and some new tricks to make them appear fuller. I apply this with the applicator it comes with and leave it on for about two minutes. This will add a little color while making your lips fuller. You can control how full thy get by wiping the product off sooner, but I just leave it on and pat it in for the best results.


After using the plumper, it is really easy to line your lips. I love to use the Mac lip pencil in Subculture, it adds a little color while still being natural. I like to apply this to the edge and then slightly push the line out with a Q-tip. This feathers the line out a little and makes your lips look much fuller, with or without the plumper. After this, fill in the outside, and smudging some into the middle. Keeping the middle of your lips lighter makes them look bigger; it is like highlighting the center of your lid. I don't like to use anything too dark for this, but I like to use a pencil as a base. Using a base for your lips creates a smooth surface, and it will keep any products you apply on top on much longer.


Next, you can choose your favorite lipstick or gloss. I like to apply a sheer layer of Mac's Cream cup lipstick with a 316 and a little bit of the Stila gloss in Malibu. This is a gorgeous soft pink combo, and it really lights up your entire face. I use Cream cup as more of a stain, it will bring everything together.


 If you really want to amp it up, I still have two more tips!


If you want your upper lip to look even fuller, I love highlighting my cupid's bow. The pro's know how to highlight, that is why all of their looks are so perfect looking. I like to use Mac's Soft and Gentle and dab a little on using a Mac 239. Make sure to blend the product out, but focus it in the center. By adding a little shimmer, it will bring the light in, making your upper lip appear much fuller.


 The next tip is like highlighting the center of your lid, it is so simple but it makes a huge difference! I like to use a shimmery eyeshadow like Mac Shroom with a sponge tip applicator and tap a little of it in the center. You can apply this under or over a gloss if you want; I like it better when it is over because it is more effective.


That is my favorite way to add something to a makeup look! I love all of these together, and I would highly recommend trying out a lip plumper if you are interested. Tell me in the comments below if you have used a lip plumper, or which one you want to try! Thanks for reading!

Friday, July 27, 2012

My Favorite Drugstore Beauty Products!

 Hey Everyone!

     I am really excited for today’s post because it combines two of my favorite things: beauty products and good deals. This is my drugstore beauty guide, so tell me in the comments if you want to see my favorite higher end beauty products on sale. I used to get the drugstore cosmetics so I can test and compare them to other brands, but now I know that the pigmentation means more than the brand name.  Here are my favorites!

 The first product  is the Revlon Lip Butters. I was curious about these, and with all of the hype around them, I decided to try them. The quality and pigmentation in these is incredible! You can easily make them more opaque, but with a soft layer you can get a light wash of color. These have a really nice sheen to them, they are glossy without being too shiny. My favorite out of the line is Tutti Fruitti, which is such a cute mango!


My next favorite is the Maybelline 24 hour Color Tattoos. These will last all day and night, so you don't have to worry about any touch ups. I was amazed when I tested out Bronze, it reminded me of a Mac paint pot! Not only is this amazing on its own, but it works really well as a base. I like to apply these with a 242 for a more bold effect, and a 217 for a light wash of color.


The NYC lip stain is a great alternative to a lipstick because it gives the color without wearing off. This product claims to last 16 hours, and it really does! A lip stain looks a lot like a marker, and the main goal is to "stain" your lips, keeping the color on. It is pretty much self explanatory, but you don't have to worry about constantly re-applying your lip color. I love all of these, but my favorite color is a really deep plum-ish red in rock on ruby.


The next favorite of mine is the Aussie smoothing serum. This works just as well as my Redken silk wear, and it is about $20.00 less! This makes your hair super soft and it tames any frizzy sections. I let my hair air dry for about ten minutes, and then I apply this and brush it through. You can put this in when your hair is dry, but it works better for me when my hair is damp. My hair is a darker brown but it looks a lot lighter because I have these natural reddish-bronze highlights. This doesn't add any color to my hair, but it really brings out the red in it!  I love putting my hair. A high bun because it really brings out the shine in it.

 
This product you can find at Target instead of most drugstores, but I just had to include the E.L.F. Translucent powder. This is a great dupe for the Makeup Forever HD powder, you get about twice the product for a fourth of the price! I apply this with a 152 brush, it covers larger areas and blends it in perfectly. It is great to have a translucent powder on hand, I even dab a little on top of a creamy lip color to make it stay on longer! Another great use is to pile it on under the eyes before you do your eye makeup, and then wipe it away when you are done to catch the fallout.


My favorite drugstore mascara is the L'oreal Voluminous Million Lashes mascara. The brush on this is so thick and full, and it really coats every lash. I prefer this one over L'oreal telescopic, my lashes clumped together really easily with it. I love the Voluminous because it makes them thicker and adds a hint of length. I have to be careful in my mascara choices, I have these really long eyelashes that clump together easily. You can always see when I am wearing it, so when I want my eyelashes to pop out I like to go for a thickening mascara. I switch between this one and my Mac false lash mascara.


 And these are my favorites! There are so many products I could write about, so tell me if you want a part 2. Tell me in the comments what your favorite drugstore beauty products are, and make sure to follow! Thanks for reading!


Thursday, July 26, 2012

Makeup Organization Tips

                                                                    Hello Readers!
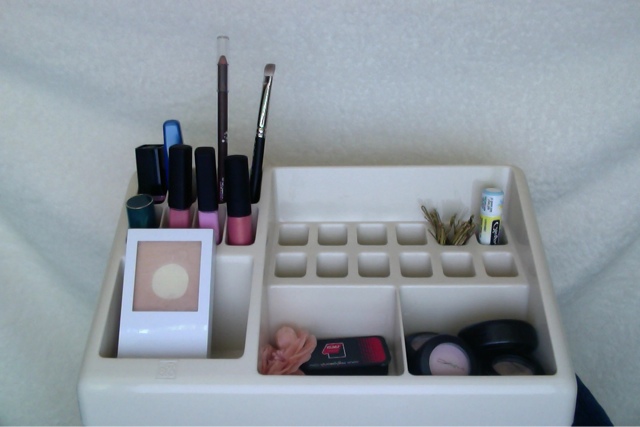
I like to be very organized, but sometimes that doesn't always work out for me. So for the past couple of days I have been trying to find a more organized way to store my makeup besides shoving it all on a Sephora bag like I used too. I found a way that is perfect for me, so I thought I would show you it!

So I had lost something awhile ago, and I was looking through some closets trying to find it, and instead I found this makeup organizer!


I love it because it had a little space for everything and it makes putting on makeup ten times easier. If you don't have the luck to find one of these in a closet, you can find them at PB Teen or Target. I suggest Target because PB Teen is awesome and has great quality stuff, but it's pricey.

So first you can see the lipstick section. Since I only have one lipstick I put it with my lipglosses so I didn't know what to use this for! So I put my chapstick in one and some bobby pins in a section incase I have a hair emergency (which I have many of).


Next is where I keep my powder. This powder container is so big it had to have a section all to itself! I also have a concealer behind the powder but you can't see it in the picture.

This is where I keep my eyeshadow collection! All four of them fit nicely in this section. It's also better because I can actually see the true colors of the eyshadows, which I couldn't really when they were all shoved in a Sephora bag.


This is probably my favorite part of the makeup organizer! It is also the part that I use most. On the top row from left to right I have my Mac 239 brush, my eyeliner, and 2 mascaras.
Then in the bottom row I have Limitless from Smashbox, Pout from Smashbox, Pop from Smashbox and then a lipstick.
And fianally in this last section I have a pack of bobby pins, and a hair clips for if I need to spice up a hairstyle.

Thats all! Comment and tell me how you organize your makeup! And follow us if you haven't done so already!

Wednesday, July 25, 2012

Benefit Box O' Powder Reviews!

 Hey Everyone!

     I had the strangest thing happen to me today. Most of you know that I am traveling because of my last post, and if you know how hectic it is to organize all of your stuff, you know where I am coming from. Anyways, I was hanging up my clothes in the closet and I found the most interesting discovery in the bottom of my bag, and it was a ton of the Benefit Box O' Powders! I was collecting these, and I must have been putting them in this bag, but I forgot all about them! Benefit is one of my favorite brands, and their powder blushes are amazing. It is so strange that I found them on vacation, but I am so glad I did!


Sugarbomb has to be one of my favorites. When this first came out, I was reminded of the NYX mosaic powders because of the multiple shade options. These are much more pigmented, and almost creamy. It is such a soft powder, and the pigmentation is amazing. When these colors are all swirled together it makes a coralish pink, and it has such a fine shimmer which comes off as more or a sheen.


Dandelion is such a beautiful light pink, it is perfect for a natural glow. I apply this with a 116 brush and press it in, and then I blend the edges out. This color is perfect for the days when you are going for a natural look, it blends in well but still adds a soft flush of color. This reminds me a lot of well dressed, but Dandelion is a hint warmer with a little less shimmer.
  
 If you are new to contouring, or maybe you just want an easy way to contour, then Benefit 10 is for you! I used this every day when I started to get into the artistry behind makeup, and I still use it often. I actually use the brush that comes with it to originally apply it, and then I blend it out with a 128 brush.


If there is one shade that I have consistently been loving, it is coral. I feel like it is really flattering on my skin tone and and works on a ton of skin tones. This is why Coralista is one of their best sellers, and one of my personal favorites. This does have a decent amount of shimmer to it, but the golden shimmer and the coral go really well together. I like to apply this with a 168 brush to blend out the product more.


Bella Bamba is a really pretty rosy pink, and the concept behind this blush is really interesting. This is described as a 3-D blush, and I think it is because of the multi-dimensional looking layers of shimmer. I would highly recommend this if you are looking to put the focus on your blush, because I need to use a really light hand if I am using it for an everyday look.


Benefit Hoola bronzer is one of the best I have ever come across. I have raved about this product in so many posts, and if you have tried it you understand why! My favorite use of this product is for contouring, but it works as a bronzer if you use a light hand. I have gone through so many of these, so you will often see me running out to Ulta if I hit pan on one!


So that is my latest discovery, and one of the best surprises I have gotten! Tell me in the comments if you have tried out any of these, and also tell me which one is your favorite! Thanks for reading!

~ Perfectly Pink

Tuesday, July 24, 2012

My Travel Hair, Makeup, And Outfit!


Hey everyone!

     Good news, I found wifi! It is on and off though, so I will try to keep posting. Anyways, I thought it would be fun to show you what my go to traveling outfit, hair, and makeup is. I love traveling, but finding the perfect outfit is close to impossible. I never know what the plan is, so I have to be prepared for anything, which kills the whole juicy couture sweat suit idea. Even though these are really comfy to travel in, I prefer something a little more dressy. If you know me, you know I am not the biggest fan of anything casual. Sorry, but tee shirts are just not my thing! Anyways, this is my favorite way to look put together while on the go.

First, I like to have a top that you can dress up easily, so I chose something that was interesting on its own. I just got in this Forever 21 trapeze cut floral top, and I love it! This top is the epitome of casual chic, it is so comfy to wear.


If I want to dress it up a little, I put my cropped black sweater over it. The black makes the bright floral print in the top pop out even more, and you can still pair it all with a necklace. I have worn this sweater so much, it is one of my basics.


I just paired this with jean shorts to complete the look. These are really comfy to travel in, so I took two pairs of these in dark and light washes. I wear these all the time because they are actually at a decent length, and they are so hard to find!


I usually live in flats because they can easily be dressed up and they are comfy. My theory is that you should always be prepared to run into someone you know when you go out, because that happens to me 99.9% of the time! Flats make me feel a little more put together then flip flops, so if I happen to see someone, I never have to worry about having on too casual of an outfit! Oh, the joys of being a beauty philosopher.


My go to hairstyle for these days is usually a French braid. They are easy, quick, and elegant, plus they stay in place! I added a head wrap with this to keep everything in place because I have a ton of layers. They look great when my hair is curled, and they look much better when they are pulled back if my hair is up.

  Next is what I wear for my travel makeup. I absolutely dread the morning when I have to leave, they are so rushed and I do not have the essential time to complete my beauty routine! I decided to find some quick fixes that take you from dull to glam in seconds, these will stay on all day without feeling thick or drying.

My first favorite is my Mac lipstick in Hot Tahiti. This is a deep red, but it has more of a sheer, shiny finish. I apply this with a 316 lip brush to get the most precise application, but it would work just as well if you applied it out of the tube. I usually stay far away from applying just a lipstick without a gloss or anything, but this has such a beautiful finish I feel like I don't need anything else. Whenever you apply a red, even if it is not very opaque, it adds a pop of color and makes you look red carpet ready in seconds. I prefer to wear it as more of a stain, but I would highly encourage you to try more of a glossy red for a youthful pop of color.


I like to keep the eyes pretty simple, so I am sticking with soft browns. My two favorites are a really warm toned brown, Modelette, and a cooler toned one, Patina. These are both from Mac, and Patina is pictured to the left. I just apply a light layer of this with a 213 brush and build up the deepness of the color as I go toward the crease.


I just top the eye look off with a thin line of liquid eyeliner and my Makeup Forever Smokey Lash. This defines my eyes without competing with the softer red lip. When you keep the eyes simple, you can have fun with brighter lip colors and beautiful blushes.

And that is all I wear for traveling makeup! If I know I am going somewhere as soon as I arrive I will do my foundation routine, so if you are interested in my latest one, click on this link.

Those are my simple steps to looking chic while on the go! If I am in a hurry I follow these, so I have the routine down for when I travel! Make sure to follow if you haven't already, and tell me in the comments what your go to look is when you are in a rush. Thanks for reading!

~Perfectly Pink

July Favorites!

                                                              Hello Readers!
        Summer is going by way to fast! I am not ready for school to start again. But thankfully it's still July. But anyways, today I am going to show you my favorite products for July!


     First off is Essie's summer collection. I am in love with these colors. They are also not very bright, which will make them pop and really look good if you have a summer tan. My favorite one is Bikini's So Teeny. Essie makes great nail polish, just sometimes their lighter colors are streaky, and the brushes are very small.


     Next up is Mac's Match Master Foundation. I am dying to try this out! All of the reviews were like pretty good so I'm assuming it works! In July, we are getting tanning and tanner and it would be too expensive to buy a foundation to match your skintone everytime you get tanner, so Mac's Match Master Foundation is supposed to match your skin tone. I hope I will get it soon so I can try it out and tell you guys about it, expect like a review post soon!


     I also love Urban Decay's Primer Potion. In July, most of us are swimming, or running through water or just spraying ourselves with a hose to stay cool! And it's a bother to have to reapply your makeup after you do this. If you put on Urban Decay's primer postion on before you put on your eyeshadow, your eyeshadow will stay on all day, and it won't run or come off! Urban Decay has also made one for like mascara, but I still need to try that out.


     In the summer I like to go with a bolder and brighter lip. I love Limitless by Smashbox, It's bright and sparkely, but it's not too much. Limitless is a pinkish coralish color. It also stays on for hours at a time, but if you need it to last all day just put on some chapstick before you apply Limitless.


     Next is All That Glitters. This is one of Mac's best selling eyeshadows because it's can be put on by itself with some mascara which gives you a great summer look, but it's also great for a summer smokey eye! Expect a post on that soon!


Thanks for reading! Comment and tell me what some of your favorite summer products are, and if you haven't followed us already, please do so!
--Glitter Girl


Monday, July 23, 2012

My Updated Foundation Routine

Hey Everyone!

     I am really excited for today's post because I am finally going to do my foundation routine! I have been changing up my routine so much, I change it depending on the seasons and what my skin needs. This is the routine that that has worked out for me, so I will add in some tips on how to customize this for your skin type.
You all know how I always use an eye primer, and that goes for my face as well! I love my Smashbox Photo Finish Primer, it decreases the size of your pores and evens out the surface of your skin. This makes it really easy to get a smooth application for any products you choose to put over it. Even though this primer is slightly expensive, it lasts forever.


My favorite foundation is the Makeup Forever HD foundation. I have been wanting to try this out for a while, so when I was at Sephora, I decided to pick one up. I like to let my skin breath, so I go foundation-less a lot too, but this is perfect for the days when I want a little more coverage. The key to this product is to use a little less then the size of a pearl, and then add more as needed. Sometimes I pump out way to much, and I just end up wasting product. If you want less coverage you can easily mix in a little moisturizer with this to get a flawless, clean look. I apply my foundation with a Mac 188 stippling brush to get the full HD effect.

I like to apply a different product to any under-eye circles instead of two layers of foundation. My favorite concealer that I have been using forever is my Mac select cover up. It is so creamy and bendable, but it will easily cover up any blemishes or under-eye circles. I apply this with a 217 blending brush to blend the product out while focusing most of it where I need it most.

Whenever you apply a liquid product, it is important that you set it with a powder. This keeps everything in place while adding a little more coverage. I love my Mac mineralized skin finish natural because it controls shine without caking up. I apply this with a Mac 189 to press it in to the foundation.

Next I want to add a little color. I have been loving cream blushes and powder blushes, but my latest favorite is Mac Coppertone. It has a sheertone finish, and it is a beautiful coppery plum. You can easily build up the coverage, and it isn't too overpowering for any eye looks that you want to do.  I like to apply this with a 116 brush to press it in.


After that I would do my contouring and highlighting and finish up with the eyes and whatever combo I decide on for the lips! Most of the time when I wear foundation, I can feel it on my skin. I feel better about wearing all of this because it lets my skin shine through.

By the way, I am going to be on vacation for the next week. I will try to keep posting if I have internet access, but if I can't I will be back in a week!

Tell me in the comments what your foundation routine is, and make sure to follow us! Feel free to request a post in the comments or email us at foreverfuchsia@gmail.com, and follow us on twitter if you have an account! Thanks for reading!

~ Perfectly Pink

Sunday, July 22, 2012

The Perfect Faux Glow

Hey everyone!

     I was out in the sun all day today, so I must admit, I expected a tan. Well, I was about a half of a shade darker then I was when summer started, so I guess I am showing improvement? Anyways, the gorgeous dark bronze glow is essential when creating your outfit of the day, and to most it is considered an accessory. Here are my secrets to getting golden without any damage from the sun!

     The key to getting a smooth and even tan is to exfoliate first. My favorite one is the Clinique Sparkle Skin body exfoliator, this one has little beads in it that burst into a creamy lather once rubbed in. If I want to make it a little stronger, I just add a touch of my St.Ives apricot scrub. Not only is the smell amazing when these are mixed, but it works really well! Exfoliating will smooth out any dry patches of skin, because the tanner will stick to dry areas.


  Now that your skin is prepped, it is time to choose your self tanner! I love the St.Tropez bronzing mousse, it is the easiest for me to use. This doesn't stain your hands terribly, but I apply it with rubber gloves just in case. I only do one layer per day, because this product really builds up quickly. Make sure to stay out of water for the next four hours, this will give you the maximum tan.


Your next step is to carry your tan up to your face. The key is to get a great bronzer and make sure that you blend it down your neck and wherever your face needs some extra color. I never tan my face, it is easier for me to just apply bronzer. Lorac has the perfect ad examples, the models are always flawlessly tanned. This might have something to do with the power of photoshop, but who says you can't achieve the same results without it?


My favorite bronzer is Nars Laguna because it looks so natural. I apply this with the 168 brush because it is perfect for distributing the same amount of product all over. The angle of this brush is great for contouring as well. I apply Laguna all over my face and down my neck, and then I can start contouring!


For contouring, I prefer my Benefit Hoola bronzer. I like to use this one for contouring because it is better for creating shadows, while Laguna works really well for an all over glow. I posted on my favorite way to get a chiseled cheekbone a while ago, you can find that post by clicking this link.


Last but not least, top your look off with a bright lip. My favorite selection of the moment is the Mac dazzleglass in Date Night. This gives a shimmery pop of color to accent your new tan!


That is how I keep my summer glow without getting any damaging rays from the sun! Make sure to follow if you haven't already, and tell me in the comments if you use a self tanner. Feel free to request a post by commenting or emailing us at foreverfuchsia@gmail.com. We are also on twitter answering any of your beauty questions, so tweet us at @foreverfuchsia. Thanks for reading!

♥ Perfectly Pink

Twitter Delicious Facebook Digg Stumbleupon Favorites More

 
Design by Free WordPress Themes | Bloggerized by Lasantha - Premium Blogger Themes | Premium Wordpress Themes