Friday, November 23, 2012

Winter Necessities

Hey Everyone!

      I am in the Christmas spirit. Yes, I know, Thanksgiving just ended, but I am a total Christmas addict! I love seeing the first snowfall, decorating the tree, and editing my beauty routine. Instead of going toward the cooler color palette, I decided to incorporate some warmer tones. Keep reading to see my favorites!

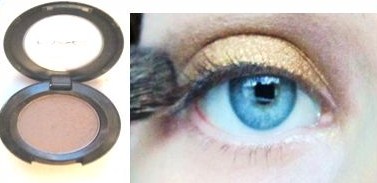
I love Rubenesque because it works for a base or by itself. This is also picture friendly; it makes your eyes stand out without it looking like there is a disco ball on your eyelids. The reason Paint Pots are so popular from MAC is mainly because they are technically a cream to powder product; they apply as a base for the shadows and then dry down to a powder to lock in the colors.
The best way to look wide awake is to line your upper lash line. By winging this product out, it makes your eyes look much bigger, making you look well rested. I am switching from black liner to brown for a change; it doesn't appear as harsh but it still defines the eyes. Another way to play with blacks and browns is to use black on the upper lash line and brown on the lower. I would not pair black and brown together, but for eyeliner, it works.
I love a classical red lip. It adds the glamorous factor to any outfit, but it can be tricky to pull off. By applying a neutral coral to the center, you are toning down the cool tones in the red, making it more wearable.

      Those are my tips to tweak your look for the holiday season! Tell me in the comments what you like to do for your winter look, and feel free to request a post. Also, let me know if you like the latest picture setup, I am loving it! If you are on twitter, follow us at @foreverfuchsia. Check out our contact us page for additional ways to get in touch. Thanks for reading!

Tuesday, November 20, 2012

The Perfect Powder Brush?

Hey Everyone!

     If you have seen any of my previous posts, you know I am a huge fan of MAC brushes. I use the numbers for references in posts, and they work out perfectly. The only brush that I have been trying to find is an all over powder brush. The natural materials MAC brushes are composed with pick up a lot of the product, but I was interested in a lighter dusting option. A fan brush was too light, but the 189 made the application too heavy. After cleaning out my closet, I discovered the long lost set of ELF brushes! Check out my reviews to see why these are my new go-to powder brushes.
Okay, I admit, this is a blush brush. I always turn into an angry bird when my concealer creases, but I always end up layering too much of the powder on. The ELF Blush Brush even distributes the product, and it gives an absolutely flawless finish. Oh, and the best part? It is only three dollars.
This is the actual ELF Powder Brush! This sets liquid foundation so well because of the size. I typically use the Blush Brush for smaller spots and under my eyes, and then go over everything with the Powder Brush. This works especially well with MAC's Mineralized Skin Finish Natural. The product and brush combined mimic the texture of you skin and even out the tone. The powder brush is three dollars as well.

You can purchase both of these brushes together for only six dollars, which is an amazing deal! Tell me in the comments if you have used any of the ELF Studio line brushes, and if so, how did you like them? Make sure to follow us on twitter under the username @foreverfuchsia, and check out the contacts page for additional ways to get in touch. Thanks for reading!

Monday, November 19, 2012

Fall Favorites


Hello Readers!
I am so sorry I have been absent from Forever Fuchsia, but I promise that this week I will try and post every day! So, back to the subject, fall is finally here, and with it my list of fall favorites! So let’s get started!

First off is Mac’s matte blush Melba.  This is my favorite blush for a dance or a night out, and it is versatile. If you apply it with a brush just one layer, it can be sheer and natural, but with many layers it can easily look more pigmented.  This is perfect for a school dance or a night out. Wear a thin layer to add a bit of color to your face. My favorite brush to use to apply this blush is Mac’s 129 brush because it is round, so it is easier to apply blush. I love Mac’s brushes because they are great quality and the bristles are exceptionally soft on your face.


Next is Rusted Rose from Sephora’s line of lip gloss. It is a classy rose color that can be used to add some sparkle to a look.  I love this lip gloss because it can go from daytime to nighttime with a simple swipe of lip gloss. But it does get rather watery which can get a problem if you are trying to put it on thickly, so use a matching lipstick or lip liner under this, and just use Rusted Rose to add sparkle.


Nicole by Opi’s The Next CEO is in my opinion one of the best nail polish colors made by that company.  I consider nails to be an accessory, and this is my favorite way to make nails noticeable, but not gaudy. It looks sparkly in the bottle, but when on the nails it is a light metallic gold. This nail polish rarely chips within two days, with two layers and a good top coat. This is definitely my new go to nail polish!


I know this is rather short, but if you want a Fall Favs part 2 post, comment and tell me! Also if you have any business inquires or something you want to tell the Forever Fuchsia team in private, email us at foreverfuchsia@gmail.com. Feel free to comment and tell me what your fall favorite is, what you think of these products, and posts requests!


Friday, November 16, 2012

Rose Gold Eyes ft. Winged Liner


Hey Everyone!
    
 I am finally back! I have been looking everywhere for my missing MAC pigment. I wanted to create a look with it, but it was gone! I ended up finding it in one of the drawers, so thankfully my collection is back to normal. Sigh.
Anyways, I wanted to try an eye look that could go from day to night, and could be created in a couple minutes. Impossible, right? I think I have figured out something that can come together and can be as dramatic as needed. Keep reading to find out how!

I first started off by priming and brightening my eye lids. Whenever I layer darker shadows, I light to start with a lighter canvas. If you are out of primer or you don’t use one, concealer can work too. Apply this to your lid, lower lash line, and brow bone to create a fresh canvas.


The reason this look is so simple is because of one product: MAC Pigments. I applied MAC’s Rose Gold Pigment all over my lid with a wet 252 brush. Rose gold is now a discontinued shade, but Antiqued Gold is very similar.


Next we want to blend out the harsh line at the crease. I chose MAC’s Patina eyeshadow to add a bit of depth to the eyes while blending. I originally applied this with a small fluff brush and then blended it out with a blending brush. This doesn’t have to be perfect; you can still blend it out more later.


I wanted a sharp wing to make my lashes appear fuller and add more intensity to the look. To create a fluid line, I applied MAC’s Typographic eyeshadow with a lightly dampened 266 brush to my upper lash line and followed to curve of my lower lash line to create the wing.


The easiest way to add intensity to a look is to add eyeliner. I applied my favorite waterline safe black eyeliner, Urban Decay’s Zero, to my waterline. You can set this with Typographic to ensure a long wearing look.

If you need to highlight the brow bone and blend out the crease any more, I would recommend doing it now. You can see the preparations because the eyeliner is now in place. 


The final step for the eyes is to add mascara, and you are done! I love how the pigment shines; it will bring out any eye color. The reason I love this look so much is it can easily be adjusted, so tweak it to your needs!

Can you tell this picture was taken in different lighting? I went from natural lighting to warm lights because it was getting darker outside, so it explains the warn tones.

For the lips, I kept it simple and combined two lip pencils. I chose NYX’s Soft Beige and Natural shades to create the finishing touch. Add a dab of your favorite clear gloss to the middle to achieve fuller looking lips.

That’s it! I hope this was helpful to those of you searching for a way to change it up; tell me in the comments if you like the new types of tutorials. Feel free to request a post, and make sure to follow us on twitter! We re-opened the FF twitter account, so make sure to check it out and follow for a daily dose of fuchsia. We are under the name @foreverfuchsia on twitter.com. Thanks for reading!


Thursday, November 8, 2012

Falling Leaves

Hey Everyone!

I am so excited to finally get up a fall tutorial! I have been messing around with so many looks for Halloween, I still have not done a fall look. Hopefully this makes up for the absent tutorials, and let's get started!
 I wanted to start by priming my eyes with Urban Decay's primer potion. This makes your shadows more opaque and also helps them last all day. I applied this with a MAC 242 brush, from my upper lash line to my brow bone.


I wanted to start adding defining my eyes, so I applied MAC's Gold Carbon Metal X cream eyeshadow to my crease. This is a very sheer product, I wanted to add a natural layer of depth before I started layering on the shadows.


I love the NARS Multiples. They are extremely pigmented, and you can use them on eyes, lips, and cheeks. I chose NARS Lamu multiple and applied it to the inner half of my eyes to start adding in the fall colors.

The key to any bold eye is to cut the crease with a deeper color. I love MAC's Embark because it sets off my eyes and is a dream to work with, so I applied it to my crease with a 213. This gives a very sharp line that can be blended out. Don't be afraid to layer products; it is harder to get a ton off but easier to layer them on.


MAC's Coppering eyeshadow can be scary on it's own, but it is the perfect addition to any fall look because of the shimmery texture. I blended out my crease by applying Coppering with a 224 brush. This blended out Embark while adding a hint of red.


I want a neutral canvas for my lid, so I decided to place MAC's Coquette all over my lid with a 222 brush. This makes it a little more matte without hiding Lamu in the inner corner. Another secret is to keep everything balanced; a good blend of mattes and shimmers does the trick.
I love to add a pop of color on the lower lash line, so I chose MAC's Soft Brown and applied it with a 239. This is a Matte reddish brown, and it will work with any eye color.


I needed a little hint of a frosty bronze, so I applied Amber Lights to the inner half of my lid with a 239. This gives a subtle pop of color, and it will open up your eyes.


The last step to the shadows is to blend out the different crease colors. I decided to use MAC's Club eyeshadow in my crease to tie all of the color in together. I originally applied this with a 213 to the crease, and then blended it out with a 224.


The final steps include applying mascara and eyeliner to finish the eyes. I used Urban Decay's Bourbon 24/7 eyeliner on the waterline and upper lash line because the flecks of gold in the rich brown make the eyes stand out.


This is the final eye look! This will work on any eye color, but it really makes blue eyes stand out. This goes into color theory, but the orange and red tones in this look are the key to making blue eyes pop. You can easily make this more natural or dramatic; you can do this by using a softer hand on the eyeliner.


For the face, I just contoured and highlighted like I normally would. I wanted to create a deep berry lip that was still substantial, but it would still let the eyes be the focus. I first applied NYX's pumpkin lip pencil to the center to highlight, and then filled in the rest with MACs Morning Coffee lip pencil. I topped it off with one coat of my EOS lip balm and then I was good to go!


That concludes my fall tutorial! Tell me in the comments how you alter your color palette for fall, and feel free to request a post. Make sure to follow to stay updated on the latest posts, and thanks for reading!


Friday, November 2, 2012

MAC Pro Products!

Hey Everyone!

     I am so excited about MAC's latest release of the Pro collection. MAC is focused on their incredible color range; they vary from matte to shimmer finishes and come in every shade imaginable. MAC Pro is for the professional makeup artists. The line used to be available on the exclusive MAC Pro website; you had to have a card to purchase the products. Now, they have finally released it to the public. See my Pro must haves in the following list.
 Sour Lemon is the prime example of why MAC was hesitant to release their pro line. You might not wear a bright lime green every day, but if you love color, this is the perfect one. This would be stunning with Vibrant Grape in the crease, it really makes a statement. 


Ground Brown will appeal to a larger range of consumers who are interested in the everyday natural look. This could be used as eyeliner during the day or in the crease for a smoked out look at night. I love the multi-use colors like these, they make everyone's morning routine a lot simpler. 


If you want a long wearing, pigmented lip color, lip erase is for you. This neutralizes the color of your lips, making the color on top more opaque. This is nice to have for professional artists, but a dab of concealer will do the trick as well. 


MAC's Set Powder may be the best kept secret. There is so much product included in this, it will last you forever. I love translucent powders, but they can make your skin seem ashy. That is not the case with the Set Powder; it leaves a soft, silky finish and extends the foundation wear time.


The key to creating runway ready cheekbones is a good contour color. MAC's Sculpting powders are fairly fool-proof if you get them in the right color. Sculpt is amazing for lighter skin tones, you really can't go wrong. If you want a sharper contour or have darker skin tones, Shadester is one of my favorites.

One of MAC's bestsellers is the huge range of Pigments. You can mix them in with clear polish to make a semi-matte nail polish, mix it in with a gloss, or use them wet/dry for an eye look. One of my favorites is Blonde's Gold.  I used this on just about every client and forgot to repurchase it. Blonde's Gold is the perfect lid color for a put together look that does not appear like you are trying too hard. It is classy, polished, and timeless. Those traits put together make a pretty impressive product.
 
Heritage Rouge is another favorite pigment of mine. This is a gorgeous deep brown-ish plum with silver shimmer in it; could it sound any prettier? This is perfect as an all over lid color for a smoky look; it can be applied heavier at the lash line and then blended out as a simple monochromatic look. 

That finishes my MAC Pro Must Haves. Make sure to follow, and tell me in the comments if you have tried the pro products before. Feel free to request reviews/tutorials in the comments as well, and check out our contact us page for more information! Thanks for reading!

Twitter Delicious Facebook Digg Stumbleupon Favorites More

 
Design by Free WordPress Themes | Bloggerized by Lasantha - Premium Blogger Themes | Premium Wordpress Themes