Sunday, October 28, 2012

It's Fantastic To Be Plastic: A Halloween Tutorial

Hey Everyone!


I seriously thought I had more time to get these Halloween tutorials out, but it is coming up too soon! I had to narrow the tutorials down to one, so I apologize in advance for the looks that have not been posted. I have always loved the "Barbie" look, so I had to do my dream tutorial! Keep reading to see my Barbie transformation.


I wanted to start with a white/pink base that will open up my eyes and make them appear larger. I decided on MAC's Let's Skate paint pot because it is a gorgeous golden pink that is full of glitter! How could it become any more Barbie-ish? Apply any shimmery color all over your lid and stop it right when you get to the crease.


You can really use any colors that you want, but I decided on the pinks and periwinkles to make the classical Barbie. I wanted to bring out the golden flecks of glitter in the paint pot, so I applied MAC's Expensive Pink with a fluffy blending brush all over the lid.


I wanted to make my eyes huge, so using cosmetics for special affects can come in handy. Makeup is all about bringing shadows and light to your face, so I applied a little of MAC's Vanilla pigment to the inner corners of my eyes. This will make them seem larger because the light will come in and reflect the pigment, making them appear much bigger. I also added a BH Cosmetics single shadow in a bright pink to the crease and lower lash line to add an extra Barbie touch.


Barbie's deep set eyes can be tricky to create; I decided to go with Poison Pen by MAC to define my crease. You can use some advanced techniques like following the shape of your eye to complete an inner wing, but using a pencil brush with any dark color will give a similar look.


This is the fun part: eyeliner! I wanted to create the look on huge, innocent eyes, so I started with a thin line all around. Barbie seems to have perfect makeup, I did not smudge any of the lines to keep it as close to perfection as possible. After completing the line, I winged out the top and added lower lashes on the bottom to make my eyes wider.


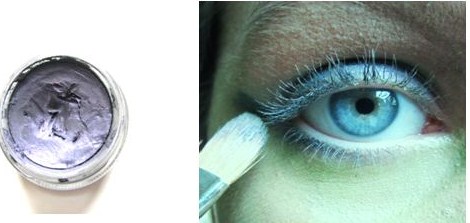
The wide awake look is hard enough to get on an everyday basis; I was contemplating how to achieve this when I needed it at a Barbie level! I decided to use my go-to weapon, MAC's Fascinating Eye kohl. I feel like I use this in every tutorial, it is so simple but it makes such a difference. I applied this to the waterline and exaggerated the inner corners to make the line fluid.


Here comes the scary part: false eyelashes. These look rather suspicious in the product picture, but they look stunning on! I used the NYX falsies and Ardell 105 lashes to achieve this look. These combined make the eyes huge, really make the Bambi eyed look. Yes, I need to come up with better comparisons!


I needed to create some supermodel cheekbones for this look, so I decided to use Shadester and Emphasize from MAC's pro sculpting product line to create them.
I applied Shadester with a 168 brush to the hollows of my cheekbones and then blended the product up. The more that you cast a shadow under your cheekbone, the higher they will appear.
Emphasize is the perfect highlight, it is natural without being too dull, but it will enhance without being full of chunky glitter.


I used my BH Cosmetics 10 professional blush palette to get Barbie's rosy cheeks. I applied the brightest pink/fuchsia  in the left row to the apples of my cheeks with a MAC 116 brush. This accented my newly formed bone structure, and it gave my the signature Barbie flush.
I did not mention anything about eyebrows in the previous steps; go ahead and make your brows thinner with a higher arch if you haven't already. I have naturally full eyebrows, so I focused the brow pencil in the middle to make them appear thinner.


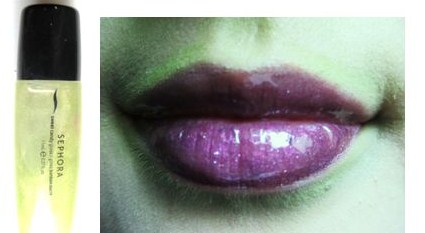
Raspberry lip pencil by BH Cosmetics was exactly what I needed to get a bright pink lip. You can use any shade of pink for this; I just decided to go bolder for the tutorial.
Sorry for the obnoxiously full lips in this picture; it stretched a little to far when I was putting the pictures together! You can make your lips as full as you want for this look, but keeping the normal shape is fine too.


 To finish off the lips, I applied MAC's Snob lipstick to the center with a 316 brush. This had a slight ombre look to it, which completed what I was going for. Finish it off with a clear gloss and you are done!
That is how turned myself into a human barbie doll!
I am so sorry this came out so late; if you are still searching for a Halloween look hopefully this helps. Make sure to check out my Fairy Dust and Green With Envy Halloween tutorials for some added inspiration. Have fun with these looks, and Happy Halloween!


Friday, October 26, 2012

MAC Starter Kit: Eyeshadows

Hey Everyone!

    In my last post, I showed you how I organize my eyeshadows. I have some crazy colors in my collection, but I have my everyday neutrals that I always come back to. If I had to pick my top MAC eyeshadows, these would be my top choices to start your collection off with!

My First favorite is Shroom. This can be used to highlight your brow bone/cheekbone, and it is a beautiful lid color. Everyone needs to have a base color in their "eyeshadow wardrobe" and Shroom has to be my favorite.

How I wear it: I typically use this as a wash of color or a brow bone highlight.


 If you favor matte colors over shimmers, you will love Blanc Type. The matte squared texture is extremely soft; it lasts forever. This is one of the most frequently used colors in my collection, I just hit pan the
other day!

How I wear it: This must be my go to highlight, it is so natural and applies smoothly. Did I mention that I adore this at all?


Naked pigment is one of my must haves. The neutral base is full of shimmer, making it perfect for an all over wash of color. If you like
your lid color to be extremely opaque, you can dampen your brush to build up the intensity.
How I wear it: I love to use this wet with a 242 brush all over my lid. Be cautious when you use this, I have had plenty of pigment explosions happen in the past!


I am also a huge fan on Vanilla pigment. This is the key to
the "angel eye" look, I love applying it all over the lid with winged
liner. If you have blue eyes, put a little but of this in the inner corner. You
will be amazed at the results!

How I wear it: I will typically use this to highlight the inner corners. This color is so beautiful by itself; you could blend it on to the lid with a little mascara and be finished!


Cork is the number one color to have on hand for a natural
eye. Shroom on the lid with cork in the crease makes a beautiful natural look.

How I wear it: I use this in the crease for a natural look and on the lid if I want it to be a bit more dramatic. The 239 brush is perfect to use with Cork!


I absolutely adore Embark for a smokey eye. This color is
so versatile; you could use it for lining the eyes, cutting your crease color,
or popping it all over the lid.

How I wear it: I would have to say that I use this to set a liquid/gel liner or by itself as a liner. It will set off all eye colors, especially lighter eyes.


Finally, MAC's all time best seller when it comes to eyeshadows is All The Glitters. I cannot say enough about this color; it can be the base for looks or it can be a sheer wash of color. Either way, this works well with any eye color and skin-tone.

How I wear it: I tend to wear this as a lid color when I want a soft look.

That summarizes my favorite MAC eyeshadows! MAC is an amazing brand, but the never ending range of colors can be confusing to those who are new to it. Even if you have been a MAC lover forever, it is always fun to see other's favorites! Tell me in the comments if you can pick your favorite, and feel free to request a post! Thanks for reading!


Wednesday, October 17, 2012

Eyeshadow Organization: Featuring My MAC Obsession

Hey Everyone!


If you have been reading this blog for a while, you might know that I am a little obsessed with MAC Cosmetics. Okay, a lot. MAC has been a long time favorite of mine because of their rich lipsticks, highly pigmented eyeshadows, and mineralized skin finishes, but most of all, their huge range of colors. MAC is more then a beauty brand, I look at it as an inspiring work of art. I used to keep my potted eyeshadows cramped up in a drawer, but I never used them much. In my makeup collection post that I wrote forever ago, I used this method of displaying them. With my setup, I can display the colors while keeping them organized!


Starting at the top of the nail polish rack I have my main palettes. I usually keep a fun colored one and a neutral one incorporating a seasonal color up here. If you are on the go a lot, shadows are more prone to breaking in pots then their pan form, so try out a palette!
In this palette the colors are:
Plumage (Outer Corner)  Steamy (Lid and lower lash line)

Electra (Lid)  Freshwater (Crease and upper lash line)

Do you like the color comparison? When I put a palette together, the colors do not have to create a look, I usually do this just to display them. If I would have to create a look for them, the use is in parenthesis. 

This is my contouring/highlighting/most used blush colors palette! Here are the colors:
Breath Of Plum  Blushbaby   Emphasize

Shadester    Coppertone   Margin

The last one on the end is Margin if the color is too light. I have some warm and cool tones in this palette, and I have found these are the best fall colors to mix and match.
I line up the colors by color, and then from light to dark. At the end of the line I put a paint pot that I think would work best with the colors.
I keep my Rock and Republic Eyeshadows out because the packaging is so beautiful. I love a product that has an "expensive" feel to it when you pick it up; they always feel sturdy.

I usually keep some pigments out as well; I like to have plenty of different textures on hand when I am trying out a new look. Pigments can add so much to a look, you can create a neutral sheen with some and an editorial look with others.


That concludes my oh-so-colorful post! Tell me in the comments how you store your eyeshadows and if you would dare to wear the bright blue colors in the palette. Feel free to leave requests in the comments and make sure to follow! Thanks for reading!

Sunday, October 14, 2012

Amazing Adele


Hello Readers!
Adele is one of the most gifted and amazing singers in the world. If you want to be like Adele, It would be almost impossible to copy her singing voice, but you can copy her makeup look! This is a tutorial on how to do the look that Adele wore to the 2012 Grammys, when she sang for the first time after getting her voice back!


First, apply Mac’s Pure White paint pot all over the lid. To do this as easily and neatly as possible, get a thick amount on the tip of your ring finger. Then dab it onto your eye lid. Don’t worry about dabbing the white onto every place on your lid, because after you do that then you can smear it around a little. This is the best way to get this white on your lid without making it look like a kindergartner’s art project. This white base really makes the eyes pop, and it will make the black eyeliner contrast really well!

Next, using a Mac 239 brush, lightly and thinly put Nylon on top of the white base, but don’t put on so much that the white base isn’t bright. For me, this was just one light layer and that was it. Make sure you don’t put on to much! Nylon is one of Mac’s best sellers, for being versatile and very pretty!


To make Adele’s signature eyeliner look, take Maybelline’s black liquid eyeliner. To do this start by making one thin line across your top lash line. Then, make the outer part of the lash line thicker than the inner part. This should lead you right into the cat eye. Put the brush at the outer part of the lower lash line and draw the cat eye upwards, then connect it to the upper lash line, fill it in and voila! Go back and fill in any parts that you might have missed.
For more information on how to make a cat eye, go to my old post How to do a Perfect Cat Eye:
http://www.foreverfuchsia.com/2012/08/how-to-do-perfect-cat-eye.html


Then,  to make big lashes that are as dark as the liquid eye liner, I used Clinique's lash doubling mascara.
It takes about 3-4 layers, but it makes your lashes super dark, long and thick!


That’s all for the eyes, but the next thing to conquer is Adele’s perfect complexion! To get this perfect skin, I used Clinique’s Tinted Skin Moisturizer in Ivory on rough spots, and then applied Maybelline’s Pure Stay Makeup Base, which is absolutely amazing. It clears up your skin, and makes it look natural. I use this every day and I love it!!!


Next, is Adele’s signature red lips. To create this look, I simply used Tart Matte Fiery Lip Tint. This stuff really works. It is a deep red color, and it goes on thickly so it’s not hard to achieve Adele’s fiery red lips!


And here is the final eye look!

I hope you enjoyed this post! Comment and tell me what celebrity you want me to do a makeup look for next! Also, if you haven't already done so, follow us! Bye for now,

Saturday, October 13, 2012

NYX HD Foundation Review

Hey Everyone!

     I am back! Sorry for being MIA for a week; it has been so hectic! I did a NYX haul about a week and a half ago, and it has given me a good amount of time to test out the products. I base my product reviews in different points depending on what type it is; foundation is typically about coverage and wear time. I also love a foundation that lets the natural glow of your skin still show without looking oily. I decided to try the NYX HD Foundation because I love the High Definition concept.


Price: This product is surprisingly inexpensive, it is typically priced at $15.00. I purchased this during Ulta's 20% off sale, so the final price was 8.99 for me.

Coverage: This is a great foundation with buildable coverage; one pump of this will give you medium coverage.

Application: I decided to use the MAC 188 brush to apply this. The 188 is a stippling brush, often referred to as the "skunk brush" because of it is a black brush tipped with white duo fiber bristles.

I purchased this shade in Soft Beige. It is really true to the color in the bottle once applied; but it did have a strong warm undertone to it. This worked out perfectly after it was blended in, but make sure to check out the rest of the shades if you have cooler undertones.


Packaging: I was very impressed with the packaging. The pump distributed just the right amount of product, and it is easy to travel with. My only complaint is it will show fingerprints, but a quick spritz of water will easily buff it away.

Amount: The NYX HD Foundation has 1.26 oz of product. Considering the higher end foundations that run around $23.00 per ounce, this comes in at an impressive $11.90 per ounce.

Would I purchase this again? Yes! The value of this foundation is amazing, and it really lives up to its claims. The texture is smooth and silky, and it is perfect to build up the coverage. If you want more of a glow to this, apply it with water. I always use water to get a fresh look to my foundation; tell me in the comments if you have ever tried this!


I am still working on the rest of my NYX reviews, keep an eye out for the rest! Make sure to check out my NYX haul, and take a look at my latest Halloween tutorial. Leave a comment below and tell me what your favorite foundation is, and feel free to request a post. Thanks for reading!

Sunday, October 7, 2012

Green With Envy: A Halloween Tutorial


Jealousy is invariably a symptom of neurotic insecurity. - Robert A. Heinlein     

Yes, I have a rather unusual greeting today, because this is a special post. I am always happy about a Halloween Tutorial, but this one is different then anything I have ever tried. My green complexion was my inspiration behind the title, and the quote was just put in for fun. Being jealous can be a sign of insecurity, so why be insecure when you can look like the Wicked Witch of the West everyday? Okay, this may be a little more appropriate for Halloween then running errands around town... Anyways, let's get started!


I am going to transform my skin by applying the green side of ELF's Olive cream shadow under my eyes. I am going to start with my face because I want my skin to be transformed. I am going for a green with a hint of golden shimmer; it will reflect the light perfectly. By applying this color under my eyes first, it will help me cover the rest of my face later.

Warning: I am about to turn green. Read at your own risk.
I want a really sharp contour under my cheekbones, so I am going to use Cover girl’s Chocolate eyeshadow. This is a deep chocolate brown, and I applied it with an angled ELF foundation brush. This is not supposed to be perfectly blended; a harsh line is what I went for. After applying this to the hollow of my cheekbones, I also applied this to the sides of my nose.  Drag this color up and under your brow bone; it will give a cat-like appearance.
Next up is the eyes! When I think of an evil witch, I think of purple and green. I already have the green for my face, so I decided to use a deep purple on my eyes. Imaginary paint pot was the perfect selection to prime my eyes and create a layer of color. I applied this to my lids using a 252 flat shader brush. After I went over my lower lash line with this color, I winged it out. Make sure to follow the curve under your eye to ensure perfectly even wings. 
I wanted to make my eyes appear larger without adding and shimmer/brightening the lid, so I decided to use MAC's Fascinating eye kohl on my waterline. This might make your lower lashes white, but it can easily be fixed with mascara. Lining the waterline will create a finished look, and the white ties in the next couple of steps. Wing Fascinating out on top of Imaginary paint pot after applying it to your waterline.


 Now it is time to smoke everything out! I wanted a blendable black, so I chose MAC's Typographic. I used a 275 brush and applied it to my lower lash line, outer corner, and on top of Fascinating. The three colors created a triple wing, and they blend together beautifully. 


This is where the crazy eyeliner starts. I used Urban Decay Zero to line around my eyes, and then I traced the outside of the white wing to define it. I wanted my eyes to have a perfect point to them, so I winged the liner down in the inner corner. I was shocked at the difference that this made, it created a powerful, defined eye. I did use Typographic on an angled brush to make sure the line was as precise as it could be. 


To finish off the eyes, I used MAC's False Lash Mascara and a ton of fake lashes. I used two strips on my lower lash line and two on my upper lash line. After making sure those were set in place, I filled in any gaps with individual lashes. This added so much drama to my eyes; it is a little bit on the creepy side!

I applied MAC's Purple Dash for a deep purple lip. This has such a pretty violet pearl to it; it adds that extra pop. Matte lips are great for some looks, but I want this to be a flawless version of an evil witch. Gloss is up next!


I decided on Sephora's Lime Blossom Candy Gloss to top off Purple Dash. Lime Blossom has a ton of green and golden shimmer to it; it will add some warmth to the look. This shows that a little gloss makes a huge difference. My lips look so much fuller! 


That concludes my second Halloween look! Click here to see my first "Fairy Dust" look. Tell me in the comments if you have any requests, and make sure to let me know what you think about this one! Thanks for reading!

Twitter Delicious Facebook Digg Stumbleupon Favorites More

 
Design by Free WordPress Themes | Bloggerized by Lasantha - Premium Blogger Themes | Premium Wordpress Themes