Showing posts with label face products. Show all posts

Saturday, September 29, 2012

MAC Studio Sculpt Foundation Review

Hey Everyone!

     I have been reorganizing my collection and finding some old favorites. This is great because I can use up some of my products, but this one I haven't even opened! Yes, I admit, there was a stray tube of Studio Sculpt in my collection. I have been testing out some different foundations to see what will work best for fall, and this product was calling me to review it. I hope this is helpful to some of you that are searching for a new foundation, let's get started!


This is a full coverage foundation, I can even pull this off as a concealer. It is a gel based formula, which makes it extra creamy. I purchased this in NC20, and it is a little too yellow. Despite the strong warm tones, it blends in very easily. For medium coverage, I would start with a small pearl sized amount and build up from there. I tried mixing this in with a little of Clinique's moisturizer lotion and it worked perfectly as a light to medium coverage foundation. It didn't work as well with the gel formula of Cliniqe's famous yellow moisturizers, I think the gel formulas comined was a bit much. Studio Sculpt also has SPF 15 in it, which is another added bonus.
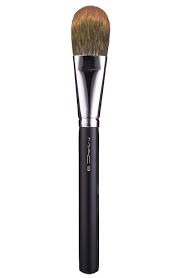
I tried to apply this with a 188, but it would not blend due to the thicker formula. I found the best match for Studio Sculpt was a flat foundation brush. I love the 190, but to save application time, the 189 is my all time favorite. I apply it first, and then blend it out with the 109 brush. This distributes the product out evenly, and it creates an even canvas for any look.

The one downside to this product is the scent. It has a paint-like smell when you first apply it, but it goes away after a couple of minutes. If you are very sensitive to scents, you may want to test this out before deciding to purchase it.


Even though this is a bit difficult to blend, it stays in place all day. I forgot to set it one day and it wore a good ten hours before it started to fade. I like to set it with MAC's select sheer loose powder to keep my face matte throughout the day. You could set this with a translucent powder as well if you want a matte finish without the coverage.


Overall, I was very impressed with Studio Sculpt. If you are interested in amping up the coverage of your foundation for fall, make sure to check this product out. To update you all, we are so sorry for the lack of posts going up. The Forever Fuchsia team is still dedicated to bringing you beauty tips and makeup news, we will get back on our usual posting schedule soon. Tell me in the comments what your favorite foundation is, and make sure to follow! Thanks for reading!

Thursday, August 23, 2012

How To Create A Fast, Flawless Face

Hey Everyone!

     I have been working on a quick routine for a fresh, flawless face, and I think I have finally found a solution! I have always used a quick spritz of water on my brush for any full coverage foundations, but I never knew it could be so easy to create a perfect canvas within seconds, just be using water. This is my favorite way to stay matte throughout the day without it looking too flat.

My first step is to prime your face using your favorite primer. Mine is Smashbox Photo Finish, it is a little more expensive but it will last forever. This is still in the old packaging, but it is the original formula. I apply this really quickly with a 189 brush, you only need a quick layer for this step.


Now that we have the perfect base down, we want to add a little more coverage. If you have seen some of my previous posts, you know I absolutely adore my Mac Mineralized Skin Finish Natural. This is my favorite setting powder, but by using a 187 brush and a little bit of water, you can easily turn this into a liquid foundation! You can use water on this because it is a mineralized product, but I would use a mixing medium if you are working with any of their "cooked" products that do not contain minerals.

Take your 187 brush, and spray it two or three times to get the tip of it damp. I love to use a duo-fiber brush for looks like this, it gives the lightest application and blends so easily. Now you can pick up a little of your powder and buff it in. This lets your skin shine through, but it will take care of any redness or discoloration. I would still use concealer under the eyes, but that should work for the perfect light to medium coverage.


My newest trick is to blend your blush up, not out. You want this to be very soft, the 80's look of having a harsh line is still out, unless I didn't get the memo. Start at the apple of your cheek and then blend up, this will distribute the product and tricks the eye, creating the look of higher cheekbones. If you want a quick face-lift, make this your secret weapon. This is Mac's cream blush in Poesy.


The quickest way to add a pop of color is to apply your favorite lip color, I chose my NYX Peekaboo Neutral lip pencil with a hint of Mac's C-thru gloss in the center. This created more fullness, and it will bring out any of the high points on your face. 


All you have to do is finish off with your favorite eye look and you are finished! One of my other favorite powders to use wet is the NYX black label powder, this is amazing for setting areas with fine lines, such as any undereye concealers. I like to use this with a smaller form of the 187, the 188, and apply it with a light hand to any areas that need some more coverage. The darker swatch is wet, and the lighter one is dry.

Those are my favorite ways to create a really quick foundation routine! If you used a cream blush like I did, make sure to apply it first before the powder. I love the whole concept of using different products in their "wet" form, it really brings out the richness of the color.

Tell me in the comments if you have tried this before, and make sure to follow! Thanks for reading!


Wednesday, July 25, 2012

Benefit Box O' Powder Reviews!

 Hey Everyone!

     I had the strangest thing happen to me today. Most of you know that I am traveling because of my last post, and if you know how hectic it is to organize all of your stuff, you know where I am coming from. Anyways, I was hanging up my clothes in the closet and I found the most interesting discovery in the bottom of my bag, and it was a ton of the Benefit Box O' Powders! I was collecting these, and I must have been putting them in this bag, but I forgot all about them! Benefit is one of my favorite brands, and their powder blushes are amazing. It is so strange that I found them on vacation, but I am so glad I did!


Sugarbomb has to be one of my favorites. When this first came out, I was reminded of the NYX mosaic powders because of the multiple shade options. These are much more pigmented, and almost creamy. It is such a soft powder, and the pigmentation is amazing. When these colors are all swirled together it makes a coralish pink, and it has such a fine shimmer which comes off as more or a sheen.


Dandelion is such a beautiful light pink, it is perfect for a natural glow. I apply this with a 116 brush and press it in, and then I blend the edges out. This color is perfect for the days when you are going for a natural look, it blends in well but still adds a soft flush of color. This reminds me a lot of well dressed, but Dandelion is a hint warmer with a little less shimmer.
  
 If you are new to contouring, or maybe you just want an easy way to contour, then Benefit 10 is for you! I used this every day when I started to get into the artistry behind makeup, and I still use it often. I actually use the brush that comes with it to originally apply it, and then I blend it out with a 128 brush.


If there is one shade that I have consistently been loving, it is coral. I feel like it is really flattering on my skin tone and and works on a ton of skin tones. This is why Coralista is one of their best sellers, and one of my personal favorites. This does have a decent amount of shimmer to it, but the golden shimmer and the coral go really well together. I like to apply this with a 168 brush to blend out the product more.


Bella Bamba is a really pretty rosy pink, and the concept behind this blush is really interesting. This is described as a 3-D blush, and I think it is because of the multi-dimensional looking layers of shimmer. I would highly recommend this if you are looking to put the focus on your blush, because I need to use a really light hand if I am using it for an everyday look.


Benefit Hoola bronzer is one of the best I have ever come across. I have raved about this product in so many posts, and if you have tried it you understand why! My favorite use of this product is for contouring, but it works as a bronzer if you use a light hand. I have gone through so many of these, so you will often see me running out to Ulta if I hit pan on one!


So that is my latest discovery, and one of the best surprises I have gotten! Tell me in the comments if you have tried out any of these, and also tell me which one is your favorite! Thanks for reading!

~ Perfectly Pink

Monday, July 23, 2012

My Updated Foundation Routine

Hey Everyone!

     I am really excited for today's post because I am finally going to do my foundation routine! I have been changing up my routine so much, I change it depending on the seasons and what my skin needs. This is the routine that that has worked out for me, so I will add in some tips on how to customize this for your skin type.
You all know how I always use an eye primer, and that goes for my face as well! I love my Smashbox Photo Finish Primer, it decreases the size of your pores and evens out the surface of your skin. This makes it really easy to get a smooth application for any products you choose to put over it. Even though this primer is slightly expensive, it lasts forever.


My favorite foundation is the Makeup Forever HD foundation. I have been wanting to try this out for a while, so when I was at Sephora, I decided to pick one up. I like to let my skin breath, so I go foundation-less a lot too, but this is perfect for the days when I want a little more coverage. The key to this product is to use a little less then the size of a pearl, and then add more as needed. Sometimes I pump out way to much, and I just end up wasting product. If you want less coverage you can easily mix in a little moisturizer with this to get a flawless, clean look. I apply my foundation with a Mac 188 stippling brush to get the full HD effect.

I like to apply a different product to any under-eye circles instead of two layers of foundation. My favorite concealer that I have been using forever is my Mac select cover up. It is so creamy and bendable, but it will easily cover up any blemishes or under-eye circles. I apply this with a 217 blending brush to blend the product out while focusing most of it where I need it most.

Whenever you apply a liquid product, it is important that you set it with a powder. This keeps everything in place while adding a little more coverage. I love my Mac mineralized skin finish natural because it controls shine without caking up. I apply this with a Mac 189 to press it in to the foundation.

Next I want to add a little color. I have been loving cream blushes and powder blushes, but my latest favorite is Mac Coppertone. It has a sheertone finish, and it is a beautiful coppery plum. You can easily build up the coverage, and it isn't too overpowering for any eye looks that you want to do.  I like to apply this with a 116 brush to press it in.


After that I would do my contouring and highlighting and finish up with the eyes and whatever combo I decide on for the lips! Most of the time when I wear foundation, I can feel it on my skin. I feel better about wearing all of this because it lets my skin shine through.

By the way, I am going to be on vacation for the next week. I will try to keep posting if I have internet access, but if I can't I will be back in a week!

Tell me in the comments what your foundation routine is, and make sure to follow us! Feel free to request a post in the comments or email us at foreverfuchsia@gmail.com, and follow us on twitter if you have an account! Thanks for reading!

~ Perfectly Pink

Sunday, July 22, 2012

The Perfect Faux Glow

Hey everyone!

     I was out in the sun all day today, so I must admit, I expected a tan. Well, I was about a half of a shade darker then I was when summer started, so I guess I am showing improvement? Anyways, the gorgeous dark bronze glow is essential when creating your outfit of the day, and to most it is considered an accessory. Here are my secrets to getting golden without any damage from the sun!

     The key to getting a smooth and even tan is to exfoliate first. My favorite one is the Clinique Sparkle Skin body exfoliator, this one has little beads in it that burst into a creamy lather once rubbed in. If I want to make it a little stronger, I just add a touch of my St.Ives apricot scrub. Not only is the smell amazing when these are mixed, but it works really well! Exfoliating will smooth out any dry patches of skin, because the tanner will stick to dry areas.


  Now that your skin is prepped, it is time to choose your self tanner! I love the St.Tropez bronzing mousse, it is the easiest for me to use. This doesn't stain your hands terribly, but I apply it with rubber gloves just in case. I only do one layer per day, because this product really builds up quickly. Make sure to stay out of water for the next four hours, this will give you the maximum tan.


Your next step is to carry your tan up to your face. The key is to get a great bronzer and make sure that you blend it down your neck and wherever your face needs some extra color. I never tan my face, it is easier for me to just apply bronzer. Lorac has the perfect ad examples, the models are always flawlessly tanned. This might have something to do with the power of photoshop, but who says you can't achieve the same results without it?


My favorite bronzer is Nars Laguna because it looks so natural. I apply this with the 168 brush because it is perfect for distributing the same amount of product all over. The angle of this brush is great for contouring as well. I apply Laguna all over my face and down my neck, and then I can start contouring!


For contouring, I prefer my Benefit Hoola bronzer. I like to use this one for contouring because it is better for creating shadows, while Laguna works really well for an all over glow. I posted on my favorite way to get a chiseled cheekbone a while ago, you can find that post by clicking this link.


Last but not least, top your look off with a bright lip. My favorite selection of the moment is the Mac dazzleglass in Date Night. This gives a shimmery pop of color to accent your new tan!


That is how I keep my summer glow without getting any damaging rays from the sun! Make sure to follow if you haven't already, and tell me in the comments if you use a self tanner. Feel free to request a post by commenting or emailing us at foreverfuchsia@gmail.com. We are also on twitter answering any of your beauty questions, so tweet us at @foreverfuchsia. Thanks for reading!

♥ Perfectly Pink

Tuesday, June 12, 2012

Highlighting Techniques


Hey everyone!

     I absolutely adore highlighting. I have mentioned it quite a bit in my previous posts, and today I'm going to share my favorite tips and tricks!


My favorite thing to do with a shimmery loose powder is to mix it in with a little foundation! This creates a brightening look all over. If you want to use it all over your face, use a little less of the powder. Remember, you can always add more! I like to apply my foundation first, and then use this technique with any spare product I have left.


I am also obsessed with high beam. I like to put about three dots of this on the top of my cheekbones. The best part about High Beam is the buildable shimmer it. I love to tap a little on my Cupid's bow to make my lips look fuller!


Not only is Smashbox photo op an amazing brightener for under eye circles, it is also the perfect sheer highlighter. I like to use the triangle technique with this. Before you conceal any under eye circles, make a triangle pointing down. Blend this out to light up your face and hide redness! Sorry for the strange picture, but I thought this was the best way to show you what I meant! 


Cream color bases are amazing for the girl on the go. You don't have to mix, blend, or conceal anything, you just use it! I love to use this CCB in pearl in the middle of my eyelid. Not only does this provide a base, but it is a cream product, providing more of a reflection. When the light bounces off of this, it will light up your whole face!


Too face candlelight powder is the perfect color for any skintone. I actually used this as an eyeshadow for a while because the gold reflects in it brought out my blue eyes. Now I like to take a dot of it and apply it to the inner corner of the eye. Your eyes are the key to any expression, you might as well let them shine!


Thanks for reading, and tell me in the comments what your favorite highlighter is. Make sure to follow by pressing the Join This Site button to the right!


♥ Perfectly Pink

Monday, June 11, 2012

Cream Blushes!


Hey everyone!

    Do you ever wish your skin had more of a dewy glow? I have dry combination skin, my cheeks are dry while my T-zone is oily. I love the rosy glow that a powder blush gives, but in drier skin it can easily fade or look dull. that is why I love to wear cream blushes! you can find a creamy formula from just about any brand, so I will write about my technique!

     I like to start off with a stippling brush, often referred to as a skunk brush because of the black base and white tip to the bristles! I prefer a stippling brush because it has a softer, more airbrushed finish. If you use a paddle foundation brush, which is more dense, it will apply way too much of the product. Cream blushes are extremely opaque, so you need to use a softer hand when applying.


      The number one mistake most people make when applying a pigmented blush is that they start too far in. Think about it, you apply foundation around your nose to cover up redness. That is why I like to focus on blending out instead of too far in.


I would let it set a little and then softly blend any harsh lines with your fingers. The warmth from your skin makes the product more blendable!


You may not need this in the winter because your skin is naturally drier, but in the summer I like to set it with a little translucent powder. Right now I am finishing up a sample from Tarte, but any loose powder will do. Always put a loose powder over any cream product, the powder will make the cream last and it will create a smooth finish.


To keep with the glowing theme, add a little bit of your favorite highlighter to the top of the cheekbone. This draws the attention up, like a face lift in a bottle! Currently I am using High Beam by Benefit.


Thanks for reading, and tell me in the comments what your favorite cream blush is! Make sure to click the "join this site" button off to the side to follow! 

♥ Perfectly Pink

Sunday, June 10, 2012

Top Tinted Moisturizers

Hey everyone!

     Today I am going to talk about the number one most used product in the summer: tinted moisturizers. I love to use a tinted moisturizer because a heavy coat of foundation will slide off your face in the summer sun ! Here are my favorites.


My first tinted moisturizer was from Mac and I bought this along with the Honey rose magically cooling powder so I could mix the two together for a soft highlight. I will do a tutorial soon! Anyways, I love this one because it is still pigmented and will easily cover up redness without being too much.


My next favorite is the Stila sheer color SPF 15. I use mine mostly for brightening my face up because it is a little light for my skin in the summer. I originally had it in the lightest shade, but I completely forgot I gained a little color in the summer. Shocker. I love how this blend so easily, it is year not that I can put a light layer of it on just for some sun protection.


The Nars tinted moisturizer makes me feel great just by looking all of the stuff that is in it! I kind of had an Arbonne flashback when I saw this, it reminds me of the moment when I was first handed the matte Arbonne catalogue..... Sigh. Arbonne focuses on their ingredients, and I feel like Nars recognizes that we appreciate it! It has a ton of sun protecting ingredients that will keep your skin glowing all summer!


Last but not least is the Smashbox tinted moisturizer. I feel like Smashbox's products are sometimes underrated, they have a ton of amazing products that don't get a lot of hype. Their tinted moisturizer is the best of both worlds, it is extremely blendable and pigmented. It is pretty opaque, and one of my favorites. My tubes of this is all gone, I need to purchase another!


Thanks for reading, and tell me in the comments what your favorite tinted moisturizer is!

♥ Perfectly Pink

Monday, April 16, 2012

Concealer Camouflage!

Hey everyone!

     I was working on a purple and gold smoky eye yesterday, (by the way, all that glitters and plum dressing are ah-mazing together!) and saw that I had not done enough to cover up my dark under eye circles. Not only does it run in the family, but I had around four hours of sleep last night because I stayed up waaay to late working on this power point the past couple of nights. Anyways, I think it was worth it, the power point is really cool!

      My point is, there are some steps that you can add to your beauty routine to make you look like you got a happy eight hours of sleep....

First is a brightener and a primer. My favorite is Smashbox Photo Op under eye brightener, it has a slight sheen to it so when your face hits the light, it makes a reflection, making you look more awake! Plus, This does not wash out your face in pictures as some products with a shimmer in it do.

My favorite concealer is Mac's Select Cover Up. This is always what I use to start off with because there is truly no texture to it. It gives medium to full coverage without looking too thick or fake and blends in perfectly. This product does run a bit light, so I would test it out or look at some swatches before purchasing. I an usually in a mac nc20, and this is a little light for me, but it works because I only use mine for undereye circles.

Mac's Mineralized Skin Finish Natural is a lifesaver. You may have heard me rave about this in previous posts, but I adore this. It gives you the perfect amount of coverage without looking like a powder, and it still lets the natural glow of your skin show through while controlling oils and staying on all day! For this, I go from a light medium to a light plus depending on what time of the year it is. If you are looking for a pressed powder that looks super natural with buildable coverage, here it is.


Thanks for reading, and comment below on what posts you want me to do next! Also, what is your go to routine for undereye circles? Is anyone as obsessed with the Mineralized Skin Finish as I am? Also, fell free to ask me any product questions in the comments!

♥ Perfectly Pink

Thursday, April 12, 2012

Beauty Basics: Contouring

Hey everyone!

     I have been obsessed with contouring lately. It fascinates me that you can look like you lost ten pounds by just adding shadows! I do not do this daily, but if you want that extra punch to any look, try this trick!

     This is also what professional makeup artists always do. Even if your makeup is super natural for a day, you can add this step for a natural touch that looks great on everyone. Here is what I use!

First I start with Benefit's Hoola bronzer. Not only is the packaging adorable, it is the perfect matte color that is great for contouring.  Start by taking a 169 large angled contouring brush from mac. Find the hollow of your cheekbone and place the bronzer there, don't worry if it looks too harsh, we will blend it later! Start with less product on the brush, you can always add more later. If you want to, you can place this on the sides of your face for added shadows.


Next you want to add the highlighter. My favorite is soft and gentle mineralized skin finish by mac, you can also use this as an eyeshadow, by the way! I use a 165 mac brush, but this is discontinued so you can use the 188, but any highlighter brush will work. I go in a "C" by starting below the center of the eye on the top of your cheekbone. After that, take the brush and go up the cheekbone and finish below your brow bone for a light sheen that looks amazing in any lighting, especially in pictures!


Now you can blend it out, making sure that there are no noticeable harsh lines. I would love to see this with a slightly winged out liner and a fun brighter lip for spring. Maybe coral! I love spring and summer, you can get away with adding a little color!

I have been wearing my hair in the soft curls tutorial I posted, and I have been loving it! It takes me around five minutes to complete it at the most, and it hold he whole day without hairspray, keeping it very light. Plus, if it starts to annoy me, I can put it in a messy bun and have one or two curls in the front to frame my face.

Wow this is a long post! thanks for reading, be sure to follow and feel free to comment with any questions! Big thanks to our follows and supporters, you keep Forever Fuchsia going!

♥ Perfectly Pink

Tuesday, March 6, 2012

Flawless Finish

         Every girl had a dream sometime in her life to have perfect, clear skin. Foundations are either too sheer or too full coverage and get cakey, concealer only hides the redness and keeps the bumps, and skincare lines can take months to work. So that leaves us with one last solution: Get airbrushed! Airbrush makeup is great for all skin types and will not clog your pores as much as a foundation would! It blends in the different textures of you skin to create a flawless canvas, the perfect step to starting out your look.

       Temptu is currently leading the cosmetic industry in its airbrushing products. I have tried airbrush makeup before and loved it, the price is what I am not adoring!

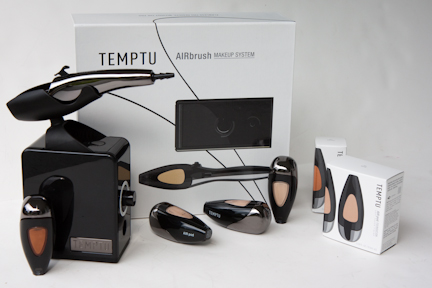
Here is the Temptu airbrush system! The product comes in these little pods that you can change out depending on what you need. They started out with just foundation, then they came out with airbrush blush, and then they came out with airbrush bronzer and highlighters! Soon there will be a long line-up of airbrush eyeshadows! I don't know, but it seems like everything is going air...


I have had a great experience with airbrush products, I am not impressed with the $250.00 price tag on it... this is the average of the price from the stores I looked at. This is not necessary for me at the moment, so I will continue with putting on foundation the  "boring way" for now! Thanks for reading, feel free to comment and be sure to follow! 
- Perfectly Pink

Twitter Delicious Facebook Digg Stumbleupon Favorites More

 
Design by Free WordPress Themes | Bloggerized by Lasantha - Premium Blogger Themes | Premium Wordpress Themes