


 Sunday, October 07, 2012
 Forever Fuchsia

Jealousy
is invariably a symptom of neurotic insecurity. - Robert A. Heinlein


I am going to transform my skin by applying the green side of ELF's Olive cream shadow
under my eyes. I am going to start with my face because I want my skin to be
transformed. I am going for a green with a hint of golden shimmer; it will
reflect the light perfectly. By applying this color under my eyes
first, it will help me cover the rest of my face later.
Warning: I am about to turn green. Read at your own risk.
Warning: I am about to turn green. Read at your own risk.

I want a really sharp contour under my cheekbones, so I am going to use Cover
girl’s Chocolate eyeshadow. This is a deep chocolate brown, and I applied it
with an angled ELF foundation brush. This is not supposed to be perfectly blended;
a harsh line is what I went for. After applying this to the hollow of my
cheekbones, I also applied this to the sides of my nose. Drag this color up and under your brow
bone; it will give a cat-like appearance.
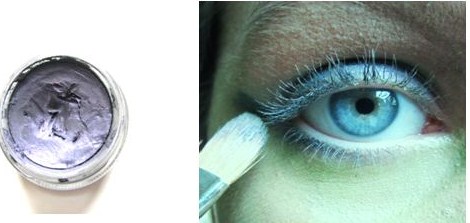
Next up is the eyes! When I think of an evil witch, I think of purple and
green. I already have the green for my face, so I decided to use a deep purple
on my eyes. Imaginary paint pot was the perfect selection to prime my eyes and
create a layer of color. I applied this to my lids using a 252 flat shader
brush. After I went over my lower lash line with this color, I winged it out. Make sure to follow the curve under your eye to ensure perfectly even wings.

I wanted to make my eyes appear larger without adding and shimmer/brightening the lid, so I decided to use MAC's Fascinating eye kohl on my waterline. This might make your lower lashes white, but it can easily be fixed with mascara. Lining the waterline will create a finished look, and the white ties in the next couple of steps. Wing Fascinating out on top of Imaginary paint pot after applying it to your waterline.

Now it is time to smoke everything out! I wanted a blendable black, so I chose MAC's Typographic. I used a 275 brush and applied it to my lower lash line, outer corner, and on top of Fascinating. The three colors created a triple wing, and they blend together beautifully.

This is where the crazy eyeliner starts. I used Urban Decay Zero to line around my eyes, and then I traced the outside of the white wing to define it. I wanted my eyes to have a perfect point to them, so I winged the liner down in the inner corner. I was shocked at the difference that this made, it created a powerful, defined eye. I did use Typographic on an angled brush to make sure the line was as precise as it could be.

To finish off the eyes, I used MAC's False Lash Mascara and a ton of fake lashes. I used two strips on my lower lash line and two on my upper lash line. After making sure those were set in place, I filled in any gaps with individual lashes. This added so much drama to my eyes; it is a little bit on the creepy side!

I applied MAC's Purple Dash for a deep purple lip. This has such a pretty violet pearl to it; it adds that extra pop. Matte lips are great for some looks, but I want this to be a flawless version of an evil witch. Gloss is up next!
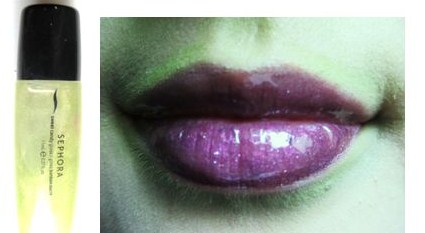
I decided on Sephora's Lime Blossom Candy Gloss to top off Purple Dash. Lime Blossom has a ton of green and golden shimmer to it; it will add some warmth to the look. This shows that a little gloss makes a huge difference. My lips look so much fuller!
That concludes my second Halloween look! Click here to see my first "Fairy Dust" look. Tell me in the comments if you have any requests, and make sure to let me know what you think about this one! Thanks for reading!

 Posted in:
8 Comments:
Such a great tutorial!!,)
laurenlovesmakeupxoxo.blogspot.co.uk
Thanks Lauren!
Woah, this is an insane transformation! This is so amazing! Love the quote too, it is so true. :)
How did you get Typographic blended out so well? It looks perfect!
Erin
Hey Erin!
I added Typographic on in layers; it is so pigmented I had to be really carful with it! Matte squared eyeshadows always have that silky texture to them,but try adding it in with a 217 until you get the full impact that you are looking for. Thanks for reading!
How did you do that? You turned green before my eyes! U are a really good makeup artist!
xoxo
lexa
love it! I am going to go as barbie for halloween.. I know this might take a lot of time to do but it would make my day if you could do a tutorial! You are so good at them! love your blog, I made a gmail account so i could follow you!
Clare
Thanks Clare! I would be happy to do a tutorial! Barbie is one of my favorite costumes to create. I can't wait to start on the tutorial! Thanks for the request!
I followed! You have a really great blog! Follow back? forever-in-pink.blogspot.com
Post a Comment