


 Sunday, September 16, 2012
 Forever Fuchsia

Hey Everyone!


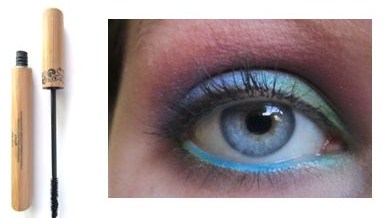
I would recommend using a concealer or foundation about one to two shades lighter then your skintone around your eyes. This works as a primer, and will brighten up your face. To start off the look, I used the MAC Chromaline in Rich purple. I applied this with a flat shader brush from Eco-Tools, I have found that this picks up the product really well. Apply Rich Purple to your crease, and then focus it on the outer corner of your lid.

I wanted to bring in some light, but without using a neutral color. I decided on Baby Blue from NYX because it adds a light wash of color, and it compliments Rich Purple. Apply this to the middle of your lid, and lightly go over the outer and inner corners. Make sure to blend this out, you want it to be very light.

This is where the blue starts to really pop. I used the MAC Chromagraphic Pencil in Hi-Def Cyan on the waterline and inner corners to incorporate it with the softer blue on the lid. This color is stunning and pigmented; one swipe will get you plenty of color. These are pretty creamy, is you have trouble with products staying on your waterline, I would set it with a powder eyeshadow. NYX's blue azure is the closest dupe I can think of.

I wanted to create a modern fairy, so I decided to toss a bit of a "nature" element in and added a lime green. This is the BH Cosmetics shade in BHCM17. I applied this with my 214 for the most precision to the lower lash line and inner corners.

Rich Purple is such a beautiful color, and I wanted to bring it out using Plum Dressing by MAC. This shade is a warm plum with a really soft layer of plum shimmer. I decided to make Rich Purple extend out a bit by blending it with Plum Dressing. A 239 brush gave me the control that I needed for this step.

The key to adding drama to any look is liner and mascara. I used Urban Decay's Zero to line my upper lash line and slightly wing it out. I didn't want this line to be too thick because I am going to use false lashes. I like to apply the lashes and then decided on how much liner I need.
My secret to blending in the fake lashes with the real ones is to use Tarte's Gifted Amazonian Clay Mascara. The natural ingredients in this will keep your lashes thick, and help the false lashes blend in flawlessly. Make sure to use a couple of coats for the fullest lashes.

I used the NYX lashes in 122 and cut the strip in half. This puts the focus on the outer corners of your eyes, making them appear larger. NYX and Ardell are the best brands that I have come across so far, they are easy to apply and last more then one application.

Even though the NYX lashes came with glue, I still like to use my Ardell Lash Grip. This one and Duo lash adhesive are my favorites, they prevent your lashes from peeling off at the ends. You only need to use a little of this; I only coat the band once and they stay on until I want to take them off. Apply another coat of your mascara to blend in your lashes with the false lashes.

Now it is time to finish off your look with a highlight! I did this last because I want some of the pigment to fall on my lashes, it builds up the effect. I used a 222 blending brush with MAC's Vanilla pigment and blended this on my brow bone. I typically use the 227 for highlighting, but I like to use something more fluffy for pigments.

For the face, I wanted my skin to look really light and have a glow to it. I started with my usual foundation routine and added a little concealer that was two shades lighter around my eyes, and anywhere I would usually highlight. This was the perfect canvas to apply Tilt and Blue Azure on to. I used a MAC 188 to get a precise application.

I absolutely love the effect of the shadows blended together. The blue and white reflects from Tilt add the perfect sheen. You don't want to blend this in too much, it adds to the natural contour of your cheeks. I placed this just above the hollow of my cheekbone and blended up.
This picture also gives you a better shot of the lashes, they really stand out from the side! I added a little more liner over the glue to blend it in, and it creates a smooth line. It looks like it was done with liquid, but I used Zero to touch it up.


Load your brush up with Rich Purple, and apply it to the outer thirds of your lips. Make sure they are filled in, and then apply Tilt just to the middle. This works as a highlight, and it creates quite an unusual lip color that works well with the eyes.
 Top it all off with a sheer neutral gloss and you are good to go! I used a disposable wand for this Smashbox gloss; I didn't wan my custom blended lip color to transfer into it.
And you are done! I know this was a long post, but I hope it helped. This look is one of my favorites, the blue blush really pulls it all together. Tell me in the comments what your Halloween plans are, and feel free to leave requests. Make sure to follow, and thanks for reading!

 Posted in:
13 Comments:
This is soo pretty! I am hosting a Halloween party, this will be perfect! love your blog, I followed. I love these tutorials, keep them up!
~Lauren
Thanks Lauren!
This tutorial was great!:)
laurenlovesmakeupxoxo.blogspot.co.uk
This look is soooo pretty :) Iskra
http://thesilentmakeover.blogspot.com/
Glad you like it, Iskra!
i like it ;)
would you like to follow each other?:)))
Thanks for the award!
Woah, you are sooo good at makeup! Did you go through cosmetology school or are you self taught?
Xoxo
C
Hey doll, love this tutorial! Such a pretty look. Love your blog, I just followed! My plans for Halloween are pretty simple, I am just going to a costume party. Oh, and I love your slider at the top! You are such an amazing writer!
Xoxo
wow this is super fantastic i love it , i love playing around with halloween ideas its on of my favourite times of year ! sorry its taken me so long to get back to you i had a broken laptop and havnt been able to blog but im back now and would love it if you checked out my new post ive followed too
www.fallinglashes.blogspot.com
Thanks Elicia! Glad you like it! Oh and to respond to Cassidy, I am self taught! Thanks for the sweet comments!
This is so gorge. Great tutorial girl!
Nadia
Post a Comment