


 Friday, November 16, 2012
 Forever Fuchsia

Hey Everyone!

I am finally back! I have been looking
everywhere for my missing MAC pigment. I wanted to create a look with it, but
it was gone! I ended up finding it in one of the drawers, so thankfully my
collection is back to normal. Sigh.
Anyways, I wanted to try an eye look that
could go from day to night, and could be created in a couple minutes. Impossible,
right? I think I have figured out something that can come together and can be
as dramatic as needed. Keep reading to find out how!

I first started off by
priming and brightening my eye lids. Whenever I layer darker shadows, I light
to start with a lighter canvas. If you are out of primer or you don’t use one,
concealer can work too. Apply this to your lid, lower lash line, and brow bone
to create a fresh canvas.

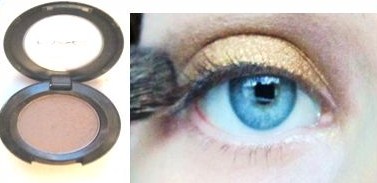
The reason this look is so
simple is because of one product: MAC Pigments. I applied MAC’s Rose Gold
Pigment all over my lid with a wet 252 brush. Rose gold is now a discontinued
shade, but Antiqued Gold is very similar.
Next we want to blend out
the harsh line at the crease. I chose MAC’s Patina eyeshadow to add a bit of
depth to the eyes while blending. I originally applied this with a small fluff
brush and then blended it out with a blending brush. This doesn’t have to be perfect;
you can still blend it out more later.

I wanted a sharp wing to
make my lashes appear fuller and add more intensity to the look. To create a
fluid line, I applied MAC’s Typographic eyeshadow with a lightly dampened 266
brush to my upper lash line and followed to curve of my lower lash line to create
the wing.

The easiest way to add
intensity to a look is to add eyeliner. I applied my favorite waterline safe
black eyeliner, Urban Decay’s Zero, to my waterline. You can set this with
Typographic to ensure a long wearing look.
If you need to highlight the brow bone and blend out the crease any more, I would recommend doing it now. You can see the preparations because the eyeliner is now in place.
The final step for the eyes
is to add mascara, and you are done! I love how the pigment shines; it will
bring out any eye color. The reason I love this look so much is it can easily
be adjusted, so tweak it to your needs!
Can you tell this picture was taken in different lighting? I went from natural lighting to warm lights because it was getting darker outside, so it explains the warn tones.

For the lips, I kept it
simple and combined two lip pencils. I chose NYX’s Soft Beige and Natural
shades to create the finishing touch. Add a dab of your favorite clear gloss to
the middle to achieve fuller looking lips.
That’s it! I hope this was
helpful to those of you searching for a way to change it up; tell me in the
comments if you like the new types of tutorials. Feel free to request a post,
and make sure to follow us on twitter! We re-opened the FF twitter account, so
make sure to check it out and follow for a daily dose of fuchsia. We are under the
name @foreverfuchsia on twitter.com. Thanks for reading!

 Posted in: perfectly pink
4 Comments:
such a pretty look, i love the rose gold!:)
http://laurenlovesmakeupxoxo.blogspot.co.uk/
I like your blog so much! Would you like to follow each other? :)
I follow you now :)
Thanks girls! I am glad you like it!
Post a Comment