Wednesday, October 3, 2012

Ulta Haul!

Hey Everyone!
     I was looking through my older posts for hauls, and much to my dismay, I couldn't find any! My last one was sometime in the past spring, so I decided to try out another one. I took advantage of Ulta's 40% off sale on NYX Cosmetics, and this is what I purchased!
Product: NYX HD Foundation
I first picked up the NYX HD foundation in Soft Beige. I picked this up to review it, so expect a more detailed post soon! This would be comparable to MAC's NC20, and it does have a strong warm undertone to it. This will be a great addition to my fall/winter foundation stash; I cannot wait to test it out!

Product: NYX Matte But Not Flat
I decided to purchase the Matte But Not Flat powder because I loved the concept behind it. This pressed powder can be used as a foundation or a setting power. I have been trying to conquer the flat look of powder ever since I discovered it, this may be my next solution. This is about one shade light on me, so it will work for brightening up under my eyes as well.

Product: NYX HD Studio Primer
The HD Studio Primer was an essential for me because I am almost out of my Smashbox Photofinish. I tested this out on the back of my hand and it has an interesting sheen to it, but it was very moisturizing. This is on my review list, I love the HD concept of the product.

Product: Revlon Photoready Primer
Okay, maybe I went a little overboard on my primer crisis... I wanted to compare the HD formula to the Photo Ready; they both have the idea of looking perfect in pictures. My first reaction to this is the "second skin" feeling it has. This primer had  a silky smooth texture to it, which is necessary in increasing the wear-time of your foundation.

Product: NYX HD Concealer
I must have been in love with the HD form of produts when I purchased the NYX HD Concealer! This has a doe-foot applicater on a wand, and I purchased it in Fair. This is a little light on me, but it is the perfect shade to use on undereye circles. My first thoughts on this are pretty good; it seems blendable but it may be prone to creasing.

Product: NYX Round Case Lipstick
I have been searching for my go-to fall lip color, but you can never go wrong with a nude lip. I decided to go with the NYX Round Case Lipstick in Creamy Beige because it is the perfect "your lip color but better" shade. Creamy Beige has the finest specks of shimmer in it, which will act as a lip highlighter.

Product: NYX Slim Lip Pencil
The NYX Lip Pencils are so inexpensive, I decided to throw in a different shade to play around with. Nude Beige is a soft brown with a grey undertone, but it will be the perfect base to layer a brighter gloss over. This shade is going to be perfect for fall, expect a tutorial coming soon!

Product: NYX Slim Lip Pencil
Even though deeper colors are in for fall, I decided to pick up the Pumpkin Lip Pencil for a fun Halloween look. This would work as a brighter color in the spring and summer, but when paired with the right gloss, it can be a beautiful shade for fall.

Products: Ulta Samples
Ulta is apparently starting up a sample program like Sephora's. They have converted to an easier to understand rewards system, and have updated their website. I chose the Ojon Hair Mask, Biore Ice Cleanser, and the Tea Tree Facial Wash. I am really excited to test out the hair mask; I have tried out Ojon's skin care products but I have never tested their hair line.
That concludes my haul! Even though it was not a ton of products, I wanted to write up a quick post to share a glimps of my latest product range that I will be working with for fall. Feel free to request reviews in the comments, and tell me what you think of the latest Ulta website. Thanks for reading!


Monday, October 1, 2012

Favorite Fall Nail Polish's

                                                              Hello Readers!
Fall is about to be here, and with it comes some new nail polish colors! Who doesn't love a deep berry color, or an elegant color that can go with anything? Keep reading to find out more!

First up is Revlon's Cherries In The Snow. This is one of my favorite nail polishes, I actually own two of them. It is perfect because it's not plain red, but it's not a bright neon pink. Cherries in the Snow is a combination of the two, which makes it my go to nail polish.


Next is Sally Hansen's Commander in Chic. Commander in Chic is sheer, so it takes a couple of coat to get the color and thickness that it looks in the bottle. To make it look more young and fun, I like to use a Sally Hansen Nail Art Pen to draw designs on it in different colors, if you want a post on different designs and ideas for the nail art pen just leave me a comment below.


Cranberry from Elf is one of my favorite nail polishes. It gives your nails that wow factor that makes people notice them. It's very sparkly and shiny, and it's opaque so it doesn't need more than two layers plus a topcoat. I have had good experiences with Elf nail polishes, they are top quality and don't chip easily.


Sally Hansen's Insta-dri Petal Pusher is a pretty light pastel color. This nail polish is very elegant, and I love to wear it for a formal occasion. This pale color compliments any skin tone nicely, and it dries fast! This nail polish would be cute with a fall dress, or a casual jeans and blouse.


Bachelorette Bash is probably the most common nail polish I wear. I love it! Bachelorette bash is shiny, opaque, and girly. This is a dark fuchsia color, or a deep berry color. Even though it has a small brush, it's easy to put on, and with a base coat, two coats, and a top coat, I guarantee no chipping for the first two days at least!


This sparkly silver topcoat from Forever 21 is sure to make your nails sparkle and shine! It looks great over a berry color, bright blue, and purple! But there are many more options too. The only problem I have ever has is taking it off. It took me half an hour to remove all of my nail polish when I put this on. But, it is defiantly worth it! If you want a post on how to easily remove glitter nail polish without ruining your nails, comment and tell me!


Comment and tell me what your favorite fall nail polish is and follow us if you haven't already! Once we get 200 followers Perfectly Pink and I will do another celebratory makeup look together! I am coming up with a cool Halloween look that should be up by the end of the week!


Glitter Girl 


Saturday, September 29, 2012

MAC Studio Sculpt Foundation Review

Hey Everyone!

     I have been reorganizing my collection and finding some old favorites. This is great because I can use up some of my products, but this one I haven't even opened! Yes, I admit, there was a stray tube of Studio Sculpt in my collection. I have been testing out some different foundations to see what will work best for fall, and this product was calling me to review it. I hope this is helpful to some of you that are searching for a new foundation, let's get started!


This is a full coverage foundation, I can even pull this off as a concealer. It is a gel based formula, which makes it extra creamy. I purchased this in NC20, and it is a little too yellow. Despite the strong warm tones, it blends in very easily. For medium coverage, I would start with a small pearl sized amount and build up from there. I tried mixing this in with a little of Clinique's moisturizer lotion and it worked perfectly as a light to medium coverage foundation. It didn't work as well with the gel formula of Cliniqe's famous yellow moisturizers, I think the gel formulas comined was a bit much. Studio Sculpt also has SPF 15 in it, which is another added bonus.

I tried to apply this with a 188, but it would not blend due to the thicker formula. I found the best match for Studio Sculpt was a flat foundation brush. I love the 190, but to save application time, the 189 is my all time favorite. I apply it first, and then blend it out with the 109 brush. This distributes the product out evenly, and it creates an even canvas for any look.

The one downside to this product is the scent. It has a paint-like smell when you first apply it, but it goes away after a couple of minutes. If you are very sensitive to scents, you may want to test this out before deciding to purchase it.


Even though this is a bit difficult to blend, it stays in place all day. I forgot to set it one day and it wore a good ten hours before it started to fade. I like to set it with MAC's select sheer loose powder to keep my face matte throughout the day. You could set this with a translucent powder as well if you want a matte finish without the coverage.


Overall, I was very impressed with Studio Sculpt. If you are interested in amping up the coverage of your foundation for fall, make sure to check this product out. To update you all, we are so sorry for the lack of posts going up. The Forever Fuchsia team is still dedicated to bringing you beauty tips and makeup news, we will get back on our usual posting schedule soon. Tell me in the comments what your favorite foundation is, and make sure to follow! Thanks for reading!
Saturday, September 22, 2012

Gold Deposit Mineralized Skin Finish

Hey Everyone!

     My summer staple used to be the Mac mineralized skin finish in Soft and Gentle. This is still one of my favorite highlight colors, but I was trying to find my latest product to get a glowy cheek. I was sorting through my collection and found Gold Deposit. I have to admit, this was an impulse buy, and I haven't used it in a couple of months. Thank goodness I found it again! I have been loving this color for fall, it is the perfect multi-purpose product.

I thought this would be too orange on my skin to use it as a highlight, so I decided to use this to warm up a blush color. I applied Gold Deposit with a 187 brush for a light wash of color. This does have quite a bit of gold to it, so it will favor warmer skin tones. I am wearing Gold Deposit over my Stila tinted moisturizer, I didn't want to do a full face because my skin has been on the drier side.

This is such a pretty color to use as an eyeshadow. I applied Gold Deposit to my crease with a 226 brush to blend it out, and on my lower lash line with a 266 brush. It applies beautifully, and builds up very easily. I am wearing Modelette on my lid and Shroom on my brow bone. I also used Browndown Fluidline on my upper lash line with a 210 brush to define my eyes.


I would not wear Gold Deposit on my eyes and cheeks at the same time, but I am wearing them both in this photo to compare how it looks on both. I love the "pumpkin" shimmer in Gold Deposit, it is my new go to color for fall.

Tell me in the comments below if you have used this product, and if so, how do you wear it? Make sure to follow, and feel free to check out our Contact Us page for any other questions at the top bar. Thanks for reading!

Thursday, September 20, 2012

Glowing Golden Eyes


                                                        Hello Readers!
Today I am going to show you a fun, easy look to pull together. This is one of my favorite looks to do, because it can easily be toned down, by using a smaller amount of eyeliner, or none at all. I know its almost fall, but we haven't lost all of our summer tans yet, which is great because this look looks super chic with a tan. So let's get started!

First I took Nylon from Mac Cosmetics and applied it all over my eye lid. Nylon is one of Mac's best sellers, because it gives you the white effect, but it had a touch of gold in it. I used this color because it will be easier to blend with All That Glitters instead of Crystal Avalanche, because Nylon is closer to All That Glitters. Nylon is a frost finish.


For the main part of the look that gives it the glowing golden effect, I put All That Glitters very thickly in the outer corner and the crease. All That Glitters is also one of Mac's best sellers because it is blend-able, and versatile. It can be used in so many different looks from a summer smokey eye to a work/school look.

The eye shadow part is pretty simple, but I wanted to do something with eyeliner to give it that big wow factor. I thought of using a golden eyeliner, but that would blend in too much with All That Glitter's. So I used  Maybelline's Ultra Liner, to make a small cat eye. This liquid liner is great because it dries fast and it comes off easily with a bit of soap, but if you have sensitive skin don't use this because it can give you a rash. I made a small cat eye on the top, and then put some on the outer part of the lower lash line.


The eyeliner is very dark black, so I needed a mascara that's the same black and the eyeliner. To do this, I usually use Mac's False Lashes Masscara, but I wanted to try something new, so I used Clinique's Lash Doubling Mascara in black. It makes your lashes look much longer, and thicker.


That all! Comment and tell me what your favorite Mac Cosmetics eye shadow, and why you like it! Also, if you haven't already followed us, please do so! Feel free to request a post, I would be happy to do it! Remember to check back soon, because I have a Halloween look post coming up, and my favorite fall nail polish's post coming up!
Glitter Girl

Sunday, September 16, 2012

Fairy Dust: A Halloween Tutorial

Hey Everyone!

     I am so excited to start our Halloween Series! I know this is pretty early to begin this, but some people start planning around this time for their big Halloween celebration. I decided to do a fairy inspired look today, but this could work for a mermaid costume as well. Just a warning: this is going to be a long post. Let's get started!


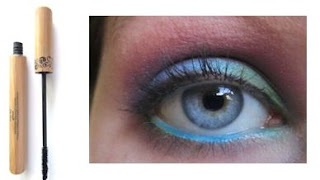
I would recommend using a concealer or foundation about one to two shades lighter then your skintone around your eyes. This works as a primer, and will brighten up your face. To start off the look, I used the MAC Chromaline in Rich purple. I applied this with a flat shader brush from Eco-Tools, I have found that this picks up the product really well. Apply Rich Purple to your crease, and then focus it on the outer corner of your lid.
I wanted to bring in some light, but without using a neutral color. I decided on Baby Blue from NYX because it adds a light wash of color, and it compliments Rich Purple. Apply this to the middle of your lid, and lightly go over the outer and inner corners. Make sure to blend this out, you want it to be very light. 


This is where the blue starts to really pop. I used the MAC Chromagraphic Pencil in Hi-Def Cyan on the waterline and inner corners to incorporate it with the softer blue on the lid. This color is stunning and pigmented; one swipe will get you plenty of color. These are pretty creamy, is you have trouble with products staying on your waterline, I would set it with a powder eyeshadow. NYX's blue azure is the closest dupe I can think of.

I wanted to create a modern fairy, so I decided to toss a bit of a "nature" element in and added a lime green. This is the BH Cosmetics shade in BHCM17. I applied this with my 214 for the most precision to the lower lash line and inner corners. 


Rich Purple is such a beautiful color, and I wanted to bring it out using Plum Dressing by MAC. This shade is a warm plum with a really soft layer of plum shimmer. I decided to make Rich Purple extend out a bit by blending it with Plum Dressing. A 239 brush gave me the control that I needed for this step.


The key to adding drama to any look is liner and mascara. I used Urban Decay's Zero to line my upper lash line and slightly wing it out. I didn't want this line to be too thick because I am going to use false lashes. I like to apply the lashes and then decided on how much liner I need.


My secret to blending in the fake lashes with the real ones is to use Tarte's Gifted Amazonian Clay Mascara. The natural ingredients in this will keep your lashes thick, and help the false lashes blend in flawlessly. Make sure to use a couple of coats for the fullest lashes.


I used the NYX lashes in 122 and cut the strip in half. This puts the focus on the outer corners of your eyes, making them appear larger. NYX and Ardell are the best brands that I have come across so far, they are easy to apply and last more then one application. 


Even though the NYX lashes came with glue, I still like to use my Ardell Lash Grip. This one and Duo lash adhesive are my favorites, they prevent your lashes from peeling off at the ends. You only need to use a little of this; I only coat the band once and they stay on until I want to take them off. Apply another coat of your mascara to blend in your lashes with the false lashes.


Now it is time to finish off your look with a highlight! I did this last because I want some of the pigment to fall on my lashes, it builds up the effect. I used a 222 blending brush with MAC's Vanilla pigment and blended this on my brow bone. I typically use the 227 for highlighting, but I like to use something more fluffy for pigments.


For the face, I wanted my skin to look really light and have a glow to it. I started with my usual foundation routine and added a little concealer that was two shades lighter around my eyes,  and anywhere I would usually highlight. This was the perfect canvas to apply Tilt and Blue Azure on to. I used a MAC 188 to get a precise application. 

I absolutely love the effect of the shadows blended together. The blue and white reflects from Tilt add the perfect sheen. You don't want to blend this in too much, it adds to the natural contour of your cheeks. I placed this just above the hollow of my cheekbone and blended up. 

This picture also gives you a better shot of the lashes, they really stand out from the side! I added a little more liner over the glue to blend it in, and it creates a smooth line. It looks like it was done with liquid, but I used Zero to touch it up.


 For the base, I used Frosted Pink from NYX's Black Label Lipsticks. It is a really soft cool toned pink with a silver glaze to it. I applied this straight from the tube because it is a lighter color, but for darker lipsticks, I usually use the 316 brush.
 Load your brush up with Rich Purple, and apply it to the outer thirds of your lips. Make sure they are filled in, and then apply Tilt just to the middle. This works as a highlight, and it creates quite an unusual lip color that works well with the eyes.

Top it all off with a sheer neutral gloss and you are good to go! I used a disposable wand for this Smashbox gloss; I didn't wan my custom blended lip color to transfer into it. 
And you are done! I know this was a long post, but I hope it helped. This look is one of my favorites, the blue blush really pulls it all together. Tell me in the comments what your Halloween plans are, and feel free to leave requests. Make sure to follow, and thanks for reading!

Saturday, September 15, 2012

Maybelline Pink Cosmo

Hey Everyone!

     I might have a new nail polish addiction to Maybelline's latest fall collection... I am back with another review! This shade is so different from Downtown Brown, but I can see how they works well together in the collection. Pink Cosmo looks like a beige with pink flecks of shimmer in it from the bottle; I was shocked when I tested it out. Overall it is a mauve-pink with light pink flecks of glitter in it, which makes a beautiful combination.

I decided on this color over the others because I thought it was so unique, and it is definitely a good shade to have on hand. Pink Cosmo is one of those colors that you can wear for a week and not worry about it chipping, the formula stays consistent with every polish that I have tried.


I love the duo-chrome finish to this; it looks like two different shades depending on the lighting. I would love to incorporate this into some nail art design. Feel free to leave requests in the comments!

Also, I am still loving the packaging! Even though it contains a little less product then other brands, it is so easy to store. The label on the top also makes this color easy to find, which is another bonus.


If you are running out of time and need a quick coat of something to get you through the day, Pink Cosmo would work. I always recommend using two coats, and it was flawless and opaque in two. By using two coats, it will decrease the chance of nail lines showing, and even out the overall look of the polish.


 That is my quick review! I absolutely adore this collection, so there may be more reviews in the future... Make sure to tell me in the comments what your go to fall color is for your nails, and make sure to follow. Thanks for reading!


Thursday, September 13, 2012

My Favorite Fall Blush Colors

Hey Everyone!

     I was sorting through my collection and came across some blushes that I had not used in a while. After swatching them and looking through my previous makeup looks, I found that I had not worn a deeper blush color for a while! The first thing that I usually switch out in the new seasons is a blush, so keep reading to find my favorites!

My first pick is Sunset Glow by Clinique. This will work on any skin tone, I use a lighter hand with a 116 brush for a really smooth application. Sunset Glow does have a touch of pink to it, so it is perfect for transitioning.

This is a deeper version of the blush. It came in a promotional set, so I would say the current color is about two to three shades lighter. If you have a lighter skin tone, I would recommend using a brush like the 187 to apply this. The 187 is a stippling brush, so you can use a light hand and get a soft wash of this so the color is not too overpowering.


My next favorite is Terra-cotta by NYX. This bronzy-peach color can be used as a blush or an over all illuminator on darker skin tones. I love the texture of this; it is smooth and applies beautifully. This is a softer powder, so a little will go a long way. This does have some shimmer to it, so if you are a fan of matte blushes, you might want to skip on this one. I have found that it appears as more of a glow then chunky glitter, so it works for me!

Another tip for this product is to apply it lower then you typically would, and then blend up. This distributes the color evenly, and because it is so highly pigmented, it will glide right on!

Nars Lamu is another one of my frequently used products. If you are completely against shimmer, stay far away from this. It has some flecks of gold glitter to it that will really stand out in bright lighting. With that being said, I don't use this a blush, but mainly as a base. This looks amazing if you just dab a little on you collar bone, it will make your neck appear longer. This is amazing for getting the glow that you see on the red carpet. The only downside to Nars products would have to be the packaging. Even though it is so sleek and pretty when you first look at it, the rubberized coat on it will pick up any smudges or smears.

The NYX Mosaic Powder in Champagne is mostly a transitional product. I don't understand the name; you would have though that they would put lighter colors in with a warmer undertone. Name aside, this has a very interesting lavender sheen to it that is great for transitioning. The touches of coral and pink in this still add a tough of summer, but the orange- bronze shades in it are stunning for fall. I love to use these mosaic powders to mix my own colors, you can customize them depending on where you focus your brush on.

My last favorite would have to be the Tarte Park Ave Princess Amazonian Clay bronzer. I always have good luck with Tarte's Amazonian Clay products, they wear for at least eight hours and apply smoothly and evenly. I first had a love-hate relationship with this product, but I was only using it as a bronzer. Even if this is a little warn for me, it is a beautiful blush and bronzer combo. If you are looking for a simple way to get a glow in your bronzer without looking oily, this is for you! I apply it in the hollow of my cheekbone and blend up, and the texture of it is so amazing.

Those would have to be my favorite products of the moment! I feel like this post is kind of packed together, so if you made it through to this point, thank you! Tell me in the comments if you switch your blush colors depending on the season, and feel free to request a post. Thanks for reading!


Twitter Delicious Facebook Digg Stumbleupon Favorites More

 
Design by Free WordPress Themes | Bloggerized by Lasantha - Premium Blogger Themes | Premium Wordpress Themes