Showing posts with label eye products. Show all posts

Tuesday, April 9, 2013

Bright Eyes For Spring + Marilyn Monroe Trick

Happy Spring!

Spring is the perfect time to start bringing out the brighter colors. I wore this look on a shopping trip with some friends and received a ton of good feedback on it! I feel like if I put more time into eyeshadow with colors, people tend to recognize it more than time spent on neutrals. Seriously, the professional at Sephora was going nuts over this.. Keep reading to see how I achieved it!

Is it just me, or is this a pop of color? I feel like it is the perfect way to branch out into brights.


Yes, I went back into the Marilyn Monroe makeup basics. Her classical look an be adapted into just about anything!

We know what she is thinking there.. Might as well add a speech bubble. I went a little bit overboard on the graphics here; I was having too much fun!

Tell me in the comments how you wear bright colors. Also make sure to let me know how you like the latest picture format! Thank you for reading!

Perfectly Pink


Monday, February 18, 2013

Winged Eyes and Orange Eyebrows... Wait, what?!?

Yes, I did a double take of the title was well. Disclaimer: this look was not worn in public. Do not try this at home.

Why did I try this? Great question. The Forever Fuchsia team was working on some new looks for posts and we came up with a challenge. Our logo designer picked out a certain number of products for each of us to try and we had to create a look with it. After looking at my kit, I knew there was no hope for the natural look. The madness is explained.


Fabulous, right? This actually was not that difficult to do; the products blended well. The eyebrows are actually the NYX lip pencil in Pumpkin, and the eyes came from a combination of MAC's Hi-def Cyan and NYX Jumbo shadow pencils.


Even though it is strange, I still get points for creativity! Tell me in the comments if you have ever attempted the colored eyebrows trend, and if so, how did you make it work? Thanks for reading!


Tuesday, January 8, 2013

My Fake Lash Proof: Part 2

Voila! Are these lashes amazing or what? If you saw my last post, you know that I am in love with false lashes. This addiction has recently blossomed; I never have reached for them in my collection before. I am thinking of placing an order and getting some in bulk soon. I wanted to share a picture of a navy smokey eye that I tried out. Before I found out the mascara secret, my smokey eyes looked like black eyes. You know, the "accidentally ran into _________" look? Oh, feel free to fill in the blank. Lashes provide an anchor for the shadow; it pulls everything together.

I used my Ardell lashes in 53 black for this look. They provide a ton of length and plenty of fullness without being too much of a drag queen look. Yes, even I have limits on my lashes. ;)

Anyways, tell me in the comments if you like the latest picture style! I have been messing around with different formatting and styles. When I only have a few pictures, I really enjoy making them a nit larger. You can see the product/look in detail which can be more helpful. Keep an eye out for a MAC haul, I got my products today! I didn't open them until I took pictures, so it is kind of an unboxing haul... Kind of. I can't wait for it!


Friday, January 4, 2013

Mint Chocolate Chip Eyes

Hey Everyone!


      I have a really simple tutorial that takes about five minutes to complete. I know it can be difficult to pull off brings colors in the winter, so I decided to use a more subtle green and a wing to make it a fun and (kind of) practical look! Keep reading to see how I completed it.


Easy, right? Feel free to add more contours/ highlights; I just loved the simplicity of it. Tell me in the comments how you incorporate bring colors into your beauty routine, and follow us on twitter under the username @foreverfuchsia. Feel free to request a post and thank you for reading!


Thursday, January 3, 2013

Palettes vs Pots

Welcome Back to Forever Fuchsia!
     I have a quick question for you all. If you saw my last tutorial post, then you know that I am going to place an order with MAC soon. I was admiring the latest PRO products (see my favorite products here!) and I saw the new palettes. I love the quads, but they only save around four dollars than getting them in pot form. The 15 color palettes seemed great, but the opaque lid made me continue to purchase the pots. Now, MAC has brought out a palette with a clear lid! You can even purchase different inserts depending on what you want to use it for.


Okay; how much more of a shiny object can you find? These look so sleek. MAC usually raises the prices every year and the pan shadows are much less expensive.
Overall, I really like the look of these new palettes. Tell me in the comments if you prefer palettes over pots and feel free to request a post. Make sure to follow us on twitter under the username @foreverfuchsia. Thank you for reading!


Wednesday, January 2, 2013

Honey and Bronze Eyes

Hey everyone!


      I was working on another simple neutral look and I came up with this! Keep reading to see the simple steps to achieve this.

I started by applying a creamy yellow base all over my lid. This is Treasure Hunt paint pot by MAC.

I applied MAC's Tweet Me eyeshadow to the outer half of my lid with a 239 brush to make my eyes appear larger.

Next, I applied the Cream Color Base in Bronze for a bit of a glow. I used a BH Cosmetics Concealer brush to smudge this on the outer corner.

To finish the look, apply a hunter green eyeliner to my upper lash line. I also applied fascinating eyeliner to my waterline.
That is it! I have a mint chocolate chip tutorial coming up, so keep an eye out for that! Tell me in the comments what posts you would like to see; I feel like I am getting into a tutorial rut. I am really excited about an upcoming event; I am finally going to indulge in a MAC haul! I have picked up random products over the past year, but I have not purchased a major "haul worthy" amount. I am loving the latest palette update... More shadows are ahead. Anyways, thank you for reading!


Monday, December 31, 2012

Pop of Emerald

Hey Everyone!


I was messing around with some blues and greens and I wanted to attempt to wear them in an everyday look. I love how it turned out; it is so much fun! Keep reading to see how I created it!


Start by priming the lids with a neutral primer.


I wanted to use a soft pink base to add a hint of shimmer, so I used the NYX jumbo shadow pencil in Yogurt.


I used an ELF 32 color palette for the green. The color I used in the third one in on the second row.


I applied Steamy by MAC to the outer corner with a 239 brush. After blending Steamy out, I lined my upper lash line with Plumage and applied it to my crease as well.


Apply mascara and that's it! Tell me in the comments if you have been wearing bright colors this winter. At first I thought I was crazy for trying to pull off brights, but I love it! Feel free to request a post in the comments and thanks for reading!


Friday, November 23, 2012

Winter Necessities

Hey Everyone!

      I am in the Christmas spirit. Yes, I know, Thanksgiving just ended, but I am a total Christmas addict! I love seeing the first snowfall, decorating the tree, and editing my beauty routine. Instead of going toward the cooler color palette, I decided to incorporate some warmer tones. Keep reading to see my favorites!

I love Rubenesque because it works for a base or by itself. This is also picture friendly; it makes your eyes stand out without it looking like there is a disco ball on your eyelids. The reason Paint Pots are so popular from MAC is mainly because they are technically a cream to powder product; they apply as a base for the shadows and then dry down to a powder to lock in the colors.
The best way to look wide awake is to line your upper lash line. By winging this product out, it makes your eyes look much bigger, making you look well rested. I am switching from black liner to brown for a change; it doesn't appear as harsh but it still defines the eyes. Another way to play with blacks and browns is to use black on the upper lash line and brown on the lower. I would not pair black and brown together, but for eyeliner, it works.
I love a classical red lip. It adds the glamorous factor to any outfit, but it can be tricky to pull off. By applying a neutral coral to the center, you are toning down the cool tones in the red, making it more wearable.

      Those are my tips to tweak your look for the holiday season! Tell me in the comments what you like to do for your winter look, and feel free to request a post. Also, let me know if you like the latest picture setup, I am loving it! If you are on twitter, follow us at @foreverfuchsia. Check out our contact us page for additional ways to get in touch. Thanks for reading!

Friday, October 26, 2012

MAC Starter Kit: Eyeshadows

Hey Everyone!

    In my last post, I showed you how I organize my eyeshadows. I have some crazy colors in my collection, but I have my everyday neutrals that I always come back to. If I had to pick my top MAC eyeshadows, these would be my top choices to start your collection off with!

My First favorite is Shroom. This can be used to highlight your brow bone/cheekbone, and it is a beautiful lid color. Everyone needs to have a base color in their "eyeshadow wardrobe" and Shroom has to be my favorite.

How I wear it: I typically use this as a wash of color or a brow bone highlight.


 If you favor matte colors over shimmers, you will love Blanc Type. The matte squared texture is extremely soft; it lasts forever. This is one of the most frequently used colors in my collection, I just hit pan the
other day!

How I wear it: This must be my go to highlight, it is so natural and applies smoothly. Did I mention that I adore this at all?


Naked pigment is one of my must haves. The neutral base is full of shimmer, making it perfect for an all over wash of color. If you like
your lid color to be extremely opaque, you can dampen your brush to build up the intensity.
How I wear it: I love to use this wet with a 242 brush all over my lid. Be cautious when you use this, I have had plenty of pigment explosions happen in the past!


I am also a huge fan on Vanilla pigment. This is the key to
the "angel eye" look, I love applying it all over the lid with winged
liner. If you have blue eyes, put a little but of this in the inner corner. You
will be amazed at the results!

How I wear it: I will typically use this to highlight the inner corners. This color is so beautiful by itself; you could blend it on to the lid with a little mascara and be finished!


Cork is the number one color to have on hand for a natural
eye. Shroom on the lid with cork in the crease makes a beautiful natural look.

How I wear it: I use this in the crease for a natural look and on the lid if I want it to be a bit more dramatic. The 239 brush is perfect to use with Cork!


I absolutely adore Embark for a smokey eye. This color is
so versatile; you could use it for lining the eyes, cutting your crease color,
or popping it all over the lid.

How I wear it: I would have to say that I use this to set a liquid/gel liner or by itself as a liner. It will set off all eye colors, especially lighter eyes.


Finally, MAC's all time best seller when it comes to eyeshadows is All The Glitters. I cannot say enough about this color; it can be the base for looks or it can be a sheer wash of color. Either way, this works well with any eye color and skin-tone.

How I wear it: I tend to wear this as a lid color when I want a soft look.

That summarizes my favorite MAC eyeshadows! MAC is an amazing brand, but the never ending range of colors can be confusing to those who are new to it. Even if you have been a MAC lover forever, it is always fun to see other's favorites! Tell me in the comments if you can pick your favorite, and feel free to request a post! Thanks for reading!


Wednesday, October 17, 2012

Eyeshadow Organization: Featuring My MAC Obsession

Hey Everyone!


If you have been reading this blog for a while, you might know that I am a little obsessed with MAC Cosmetics. Okay, a lot. MAC has been a long time favorite of mine because of their rich lipsticks, highly pigmented eyeshadows, and mineralized skin finishes, but most of all, their huge range of colors. MAC is more then a beauty brand, I look at it as an inspiring work of art. I used to keep my potted eyeshadows cramped up in a drawer, but I never used them much. In my makeup collection post that I wrote forever ago, I used this method of displaying them. With my setup, I can display the colors while keeping them organized!


Starting at the top of the nail polish rack I have my main palettes. I usually keep a fun colored one and a neutral one incorporating a seasonal color up here. If you are on the go a lot, shadows are more prone to breaking in pots then their pan form, so try out a palette!
In this palette the colors are:
Plumage (Outer Corner)  Steamy (Lid and lower lash line)

Electra (Lid)  Freshwater (Crease and upper lash line)

Do you like the color comparison? When I put a palette together, the colors do not have to create a look, I usually do this just to display them. If I would have to create a look for them, the use is in parenthesis. 

This is my contouring/highlighting/most used blush colors palette! Here are the colors:
Breath Of Plum  Blushbaby   Emphasize

Shadester    Coppertone   Margin

The last one on the end is Margin if the color is too light. I have some warm and cool tones in this palette, and I have found these are the best fall colors to mix and match.
I line up the colors by color, and then from light to dark. At the end of the line I put a paint pot that I think would work best with the colors.
I keep my Rock and Republic Eyeshadows out because the packaging is so beautiful. I love a product that has an "expensive" feel to it when you pick it up; they always feel sturdy.

I usually keep some pigments out as well; I like to have plenty of different textures on hand when I am trying out a new look. Pigments can add so much to a look, you can create a neutral sheen with some and an editorial look with others.


That concludes my oh-so-colorful post! Tell me in the comments how you store your eyeshadows and if you would dare to wear the bright blue colors in the palette. Feel free to leave requests in the comments and make sure to follow! Thanks for reading!

Tuesday, September 4, 2012

Neutral Eyes For Under $20.00

Hey Everyone!

     Today's post is going to be another tutorial, and I have been wanting to do this one for a while. This is not the twenty dollar makeup challenge, but I thought I should do something featuring drugstore products. This is a fairly basic neutral eye, and it will go with any look. Let's get started!


Base: I am going to start by applying a shimmery base all over my lid. This is Dawn from the elf studio line, and I am using it as a primer. I applied this with an elf concealer brush, but any densely packed synthetic brush will do. This color is a really pretty gold with a slight lavender base, so it will work on all eye colors.

Highlight: Next, I am going to work on highlighting the inner half of my lid. This is bringing in more light to my eyes, making them appear larger. I used Cover Girl's Champagne eyeshadow with a 213 brush and softly blended it in. You could use the elf shadow brush for a 213 dupe.
Outer V: If you want to make any neutral look pop, use a darker brown to define the outer "V" of your eyes. I used the Cover Girl Brown Smolder eyeshadow for this step, and it really pulled everything together! I applied this with a 239 brush by patting it down, and then blending it out. Make sure to blend this into the crease, it is a mistake proof way to make sure that you don't over-extend your eyeshadow.


Eyeliner: I am keeping this pretty simple, so I used the elf cream eyeliner in Metallic Olive for my upper lash line. I prefer to apply cream liners with an angle brush, and gel with something comparable to a 210 brush. This allows me to get a really clean line, and fill in any gaps by my lash line.


Mascara: The final step for this look is a coat of mascara! I finished it off with the elf waterproof mascara, the smaller brush lets me coat my lashes from the base.


My favorite part about this is that it looks amazing in any lighting. The shimmer in the highlight color is brightening, not chunky glitter, which is essential to any natural look. Tell me in the comments what your favorite product that is under $10.00 is, and make sure to follow. Thanks for reading!


Saturday, September 1, 2012

Stars N' Rockets Smokey Eyes

Hey Everyone!

     I am so sorry I have been missing, I have had a crazy week! I thought I would come back with one of my favorite posts: a tutorial. This is sort of a crazy look, but I have been wanting to do a smokey eye with a black base for a while. This is featuring Stars N' Rockets eyeshadow, it is an all time favorite of mine. Keep reading to see my go to way to wear it!

The first step is to take the NYX jumbo eyeshadow pencil and apply this all over your lid and smudge it on the lower lash line. I did not worry about precision at all with this, you can just smudge it on. These shadow sticks are amazing, they are great as a base. I used my ring finger to buff out the harsh lines, and it created a seamless primer.


Next, I applied Stars N' Rockets all over my lid with a 239 brush. This is such an amazing color, It is a purple-pink on its own, but it turns into a deep purple-blue when you layer it over a black. I just used my brush to pat the color down wherever Slate was, they make an incredible combination.


I wanted to have the lid color stand out, but the crease did need to be defined. I decided on Satellite Dreams because it will work with the products I used, and it will add a little more color. Make sure to blend this out, the key to any look is to blend. Most looks need some attention in the middle of the lid and the crease, so make sure to use small circular motions. I used a really light hand with a 224 brush for a flawless look.

Stars N' Rockets is such a unique color, I was shocked when I found the same sheen in an eyeliner! This is the Urban Decay 24/7 eyeliner in Ransom. I applied this to my outer half of my lower lash line, my upper lash line, and the outer fourth of my lid. This is just dark enough, I can use it as an eyeliner and my outer corner color. I blended this out with a 214 small smudge brush.


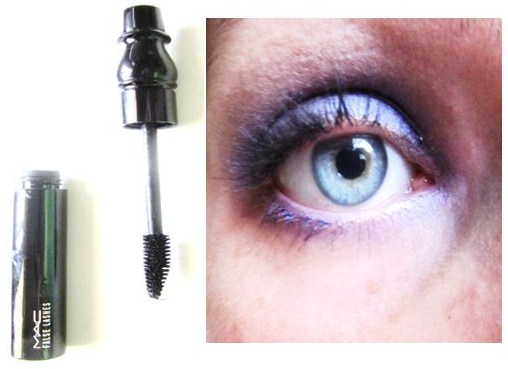
I finished off this look with Mac's False lash mascara for sky-high lashes. This is the final look, and I love it! This would be great to wear for a night out, and you can just apply Slate to the outer third to tone it down.

I have been working on a new way to show the pictures, so tell me in the comments how you like it. I love it because I can show the steps in only five pictures, and you can see my application technique throughout the process.


Tell me in the comments if you have Stars N' Rockets, and if so, what is your favorite way to wear it? I also want to tell you to keep an eye out for my latest collection post, I have re-organized everything and I love it! Feel free to ask for a post in the comments, and check out our contact us page for any questions. Thanks for reading!



Twitter Delicious Facebook Digg Stumbleupon Favorites More

 
Design by Free WordPress Themes | Bloggerized by Lasantha - Premium Blogger Themes | Premium Wordpress Themes